The Birddog
Along with the Deadbug, the Birddog is one of the two most singularly important core exercises out there. That’s why these two are the two core exercises that you learn in my BWF Primer Routine (My free bodyweight exercise routine for absolute beginners, click the link to learn more)
It is both a sibling and a successor to the deadbug. The deadbug teaches you how to breathe and brace properly, and then it challenges the strength of that brace by using the weight of the limbs. Conversely, the birddog teaches you how to coordinate yourself to maintain that brace while moving your limbs against gravity.
At the same time, it teaches you some very important concepts about spinal position that are absolutely fundamental from bodyweight exercise, to barbell lifting, to simply maintaining good posture in your day to day life.
Pre-requisites:
This exercise builds on concepts learned in the Deadbug guide. If you do not read that first, it is highly unlikely you will understand anything in this guide!
Deadbug Guide
Important Note:
From the perspective of getting the most out of this guide, it would be in your best interest to film yourself from the side doing a few reps of everything in this guide, and watch them back as you read this guide in order to get a frame of reference and learn more effectively. (Don’t worry if you don’t have a tripod to frame yourself up, you can just prop your phone against something and use the front facing camera to frame where you will be standing.)
Also the following summary of this exercise is described in about AS MUCH DETAIL AS POSSIBLE. If this is your first time learning about this exercise, this may feel like an overwhelming amount of information to you to begin with. Do not worry, this guide is so detailed simply because it is a reference guide, and not everything needs to be absorbed and perfectly replicated on your very first read through. You will most likely come back to read this guide many many times as you learn.
A Quick Spinal Anatomy Moment:
So before we learn how the birddog teaches good spine position, we need to do a quick little introduction to the spine.
The 3 (Relevant) Sections of the Spine:
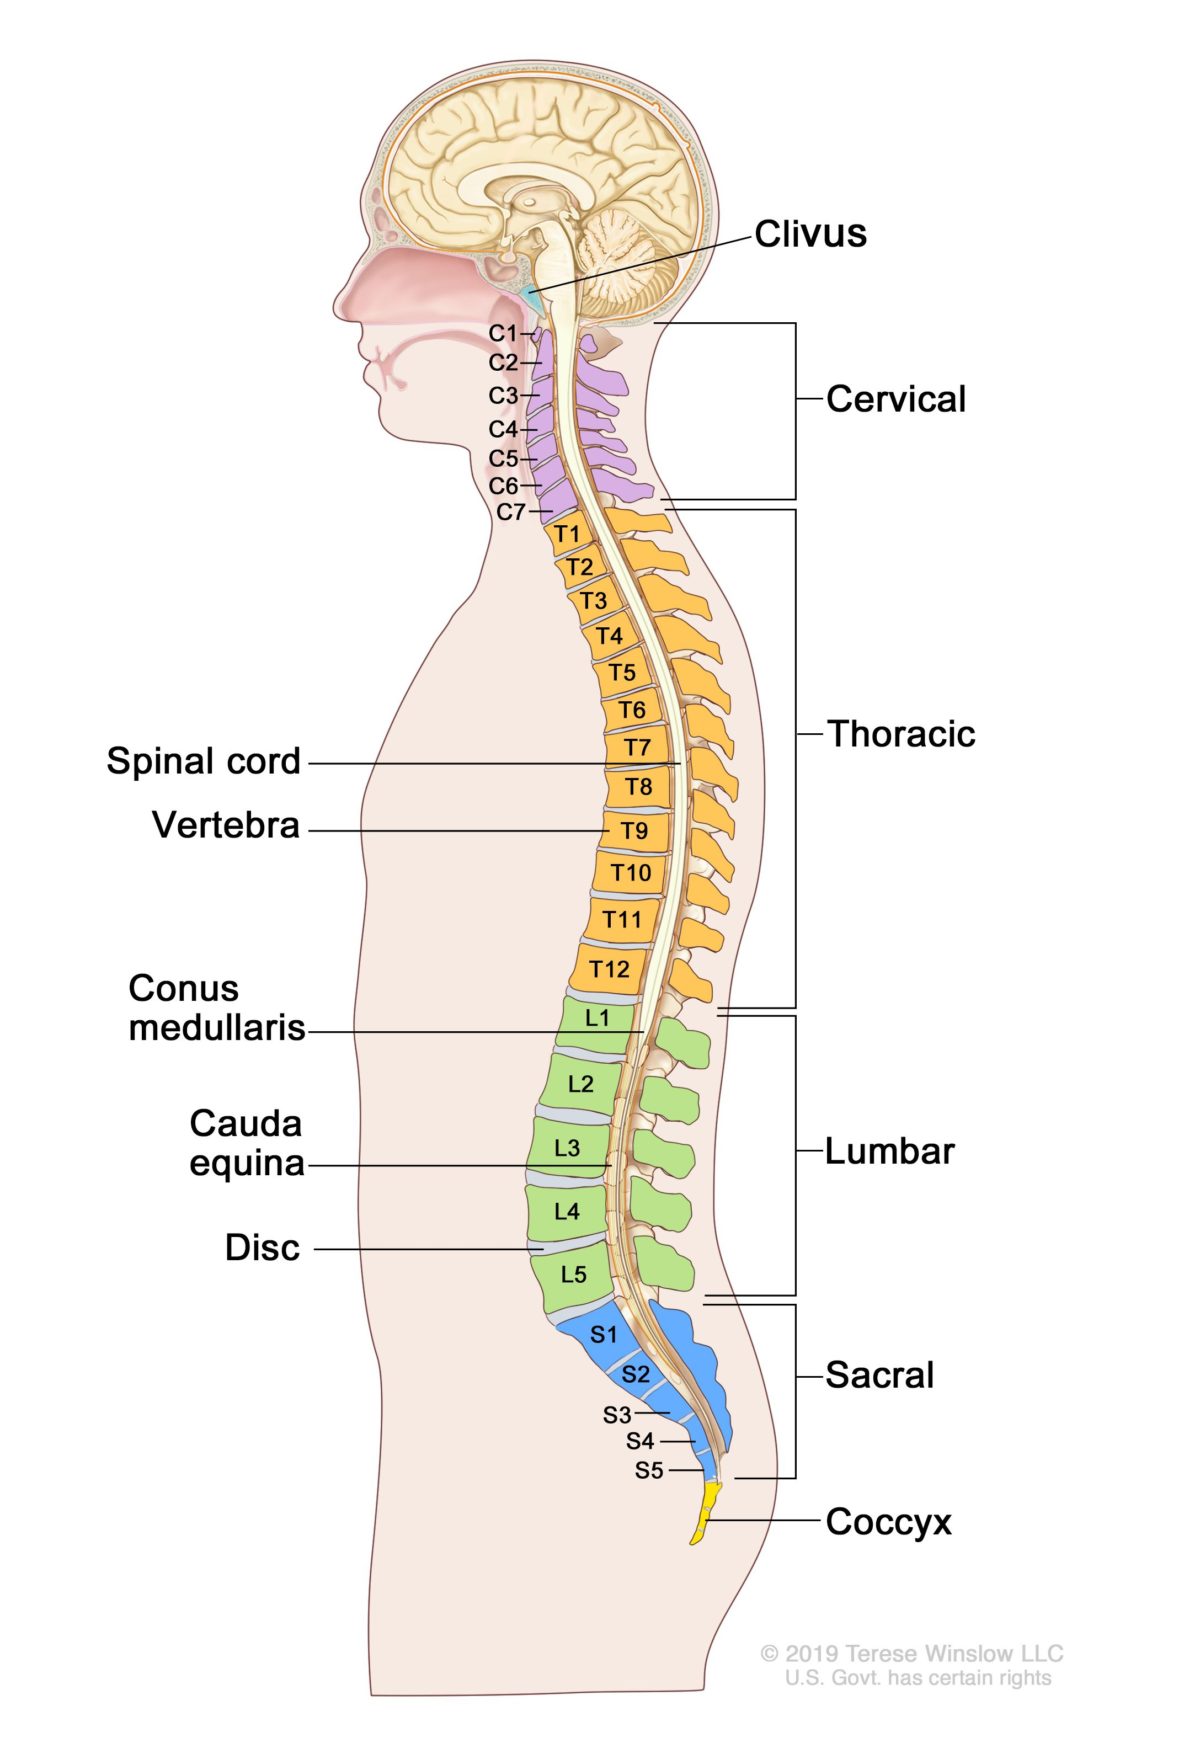
Meet: The Spine!
So the photo above is a picture dividing your spine into all its individual sections. We only need to concern ourselves with the top 3 (because the bottom two – sacral and coccyx – aren’t moveable).
The Cervical spine is your neck, the Thoracic Spine is your upper back (specifically, its’ all the part of your spine that is attached to your ribs), and your Lumbar Spine is your lower back.
For the purposes of this guide, we will just be calling the Cervical spine ‘The Neck’, but break it into the Upper Neck and Lower Neck as well as breaking Thoracic into Upper Thoracic and the T-L Junction. (This will all be explained in the next section. The fancy words make it sound complicated, but it’s not so bad; I’ll try to break it down as easy as I can.)
Your spine, as you can see, has a very, very shallow S shape naturally in its neutral position. In this position it’s extremely good at withstanding compressive force and everything is where is “should” be, so there’s no undue strain in any parts. This is extremely important not only for safety in exercise, but also in effective force transfer. If your spine is loosey goosey, at best you’re short changing yourself in the effectiveness of your workouts. At worst, you may be increasing your injury risk during certain heavy load bearing exercises like the squat and deadlift.
So if in the deadbug we learned how to Brace as a way to help build tension and stability in the front and lower back using the abdominal muscles, now we’re going to learn how to generate tension in the back (particularly the upper back) to balance out that tension in the front, to create a spine that’s strong as steel.
All kinds of Spinal Movements:
So now we’re going to break down all the (relevant) movements each section of your spine can do, so we can learn to isolate them.
Upper Neck Flexion and Extension:
So this first video is upper neck flexion. Think of it like trying to touch the front of your neck with your chin
This second video is upper neck extension. Think of it like trying to touch the back of your head to the back of your neck.
Lower Neck Flexion and Extension:
Now LOWER neck flexion looks more like trying to jut your nose out as far in front of you as you can, as shown:
Lower neck extension is like trying to give yourself a double chin while making the back of your neck as long as possible.
We will be using lower neck extension (double chin, long back of the neck) in our position for the birddog. Practice all these neck movements, but make sure you’ve got the lower neck extension down the best.
Lumbar Flexion and Extension:
Now we’ve seemingly jumped from the top to the bottom of the spine, but this is for good reason. The Thoracic spine is the most complicated, so we are going to do it last.
The easiest way to visualise lumbar movement is in an all-fours position.
The best cue to create isolated lumbar extension is is to imagine tilting your pelvis so your pointy front hip-bones point towards your feet. Shown below.
Conversely, to create isolated lumbar flexion, imagine pointing those pointy hip bones up towards your hands (or even your head!), or imagine tucking your tailbone underneath you.
We want our lumbar to be neither fully flexed nor extended in the birddog, just in a nice neutral position (or very lightly flexed, will cover this later). However, you should practice moving between these two positions for a few minutes to develop a good degree of awareness of the position of your pelvis and where it is pointing. Filming yourself would be even better.
Thoracic Spine Flexion and Extension:
Now here’s where it gets tricky!
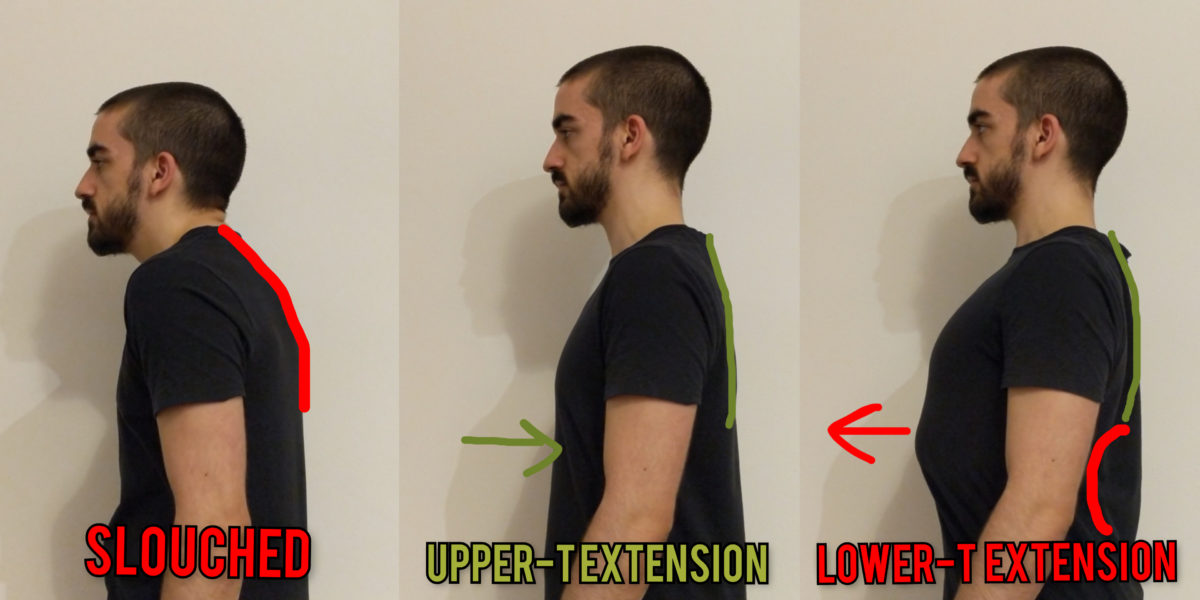
Here’s what thoracic flexion looks like (think slouching over a computer), this is not a position we actively want to hold in almost any exercise
And here’s what upper-only* thoracic extension looks like (*important distinction). This is the position we are looking to achieve in the birddog, and by extension, many other exercises as well (including, to a smaller degree, in good standing posture).
It’s a very subtle movement, but it straightens your upper back out significantly. (The above vid shows me going from a slight slouched position, to the absolute most upper thoracic extension I’m able to enter. To a trained eye that looks at spines all day, this is a pretty huge difference, but it might not look like much has changed, if you are looking at it for the first time. If you struggle to see it, watch it closely a few times or scroll down to see a side by side comparison with the flexed/slouched position for more clarity.)
Now here’s the tricky bit. The Thoracic spine is not very good at extending, and can only go so far even in the most mobile people, especially compared to the neck and lumbar spines. Not only that, it is typically the most mobile at the very bottom and least mobile at the very top.
The bottom of the thoracic spine ends at a space called the ‘T-L Junction‘, which stands for Thoracic-Lumbar Junction. It’s the junction between the Thoracic and Lumbar Spine! Quite intuitive!
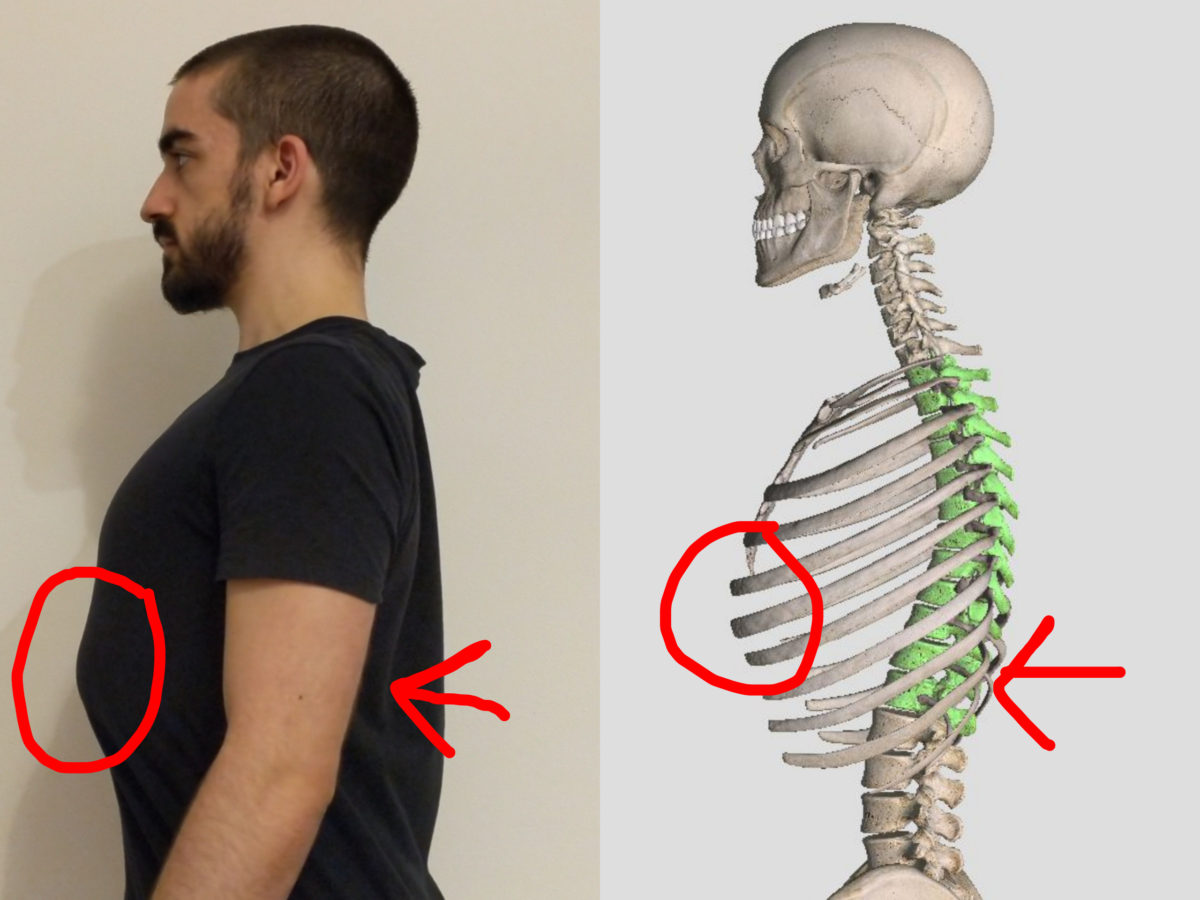
The thing you see most often when people initially try to learn how to extend their thoracic spine, is they extend a lot at the bottom, particularly the ‘T-L Junction’, and almost not at all at the top. This manifests itself as the bottom of your ribcage sticking out far in front of you like so:
As you can see, the bottom of my ribcage actually sticks out, because my lower thoracic is massively over-extending. (Pic below for clear demonstration)

However, we can see that this would be totally incompatible with everything we learned about bracing in the Deadbug, because we need to keep our ribs down in order to brace and keep a stable spine position that it won’t bend when we don’t want. So how do we extend our upper backs while keeping our ribs down? That’s right! Upper Thoracic Extension! If you check the side by side videos below, you’ll notice on the left my upper back straightens all the way out, but with no lower rib movement!
Upper Thoracic Extension
T-L Junction Extension
Here’s a pic demonstrating the differences clearly with some drawn annotations:
Most people even if they try absolutely cannot extend only their upper T-spine. While this may partly be a Mobility issue in many people, almost everyone has the capacity to extend atleast a little bit but lack the coordination to do so.
And therein lies the primary purpose for this exercise’s existence; developing the coordination to do so. So that is what we are going to do in the following section.
BUT, before we move on: Thoracic Spine vs Shoulder Movement.
Many people learning to move their thoracic spines mistake shoulder retraction (pinching the shoulders together) for thoracic extension. These are not the same movement. Notice how even in a position of thoracic extension, I can protract and retract my shoulders at will, and it does not impact my thoracic position:
Level 1: the Birddog Set-up and Static Hold
So to do the birddog setup, get on all fours. We are going to start by extending everything as much as possible, so: Stick your butt out as much as you can (Lumbar Extension), puff your chest out as far as you can (Thoracic extension, upper and lower) and look up square at the ceiling (Neck Extension, upper and lower).
From here, while extending as far as you can, tuck your chin and elongate the back of your neck (lower neck extension), and tuck the tailbone/point the hipbones up to your head, (lumbar flexion).
If you managed to do both of those while still trying to extend your upper back, it should look something like this:
By emphasising lower neck extension, the upper thoracic (because it is its direct neighbour) will be encouraged to extend as well.
By emphasising lumbar flexion, the Lower thoracic/T-L Junction (because it is its direct neighbour) will be encouraged to flex.
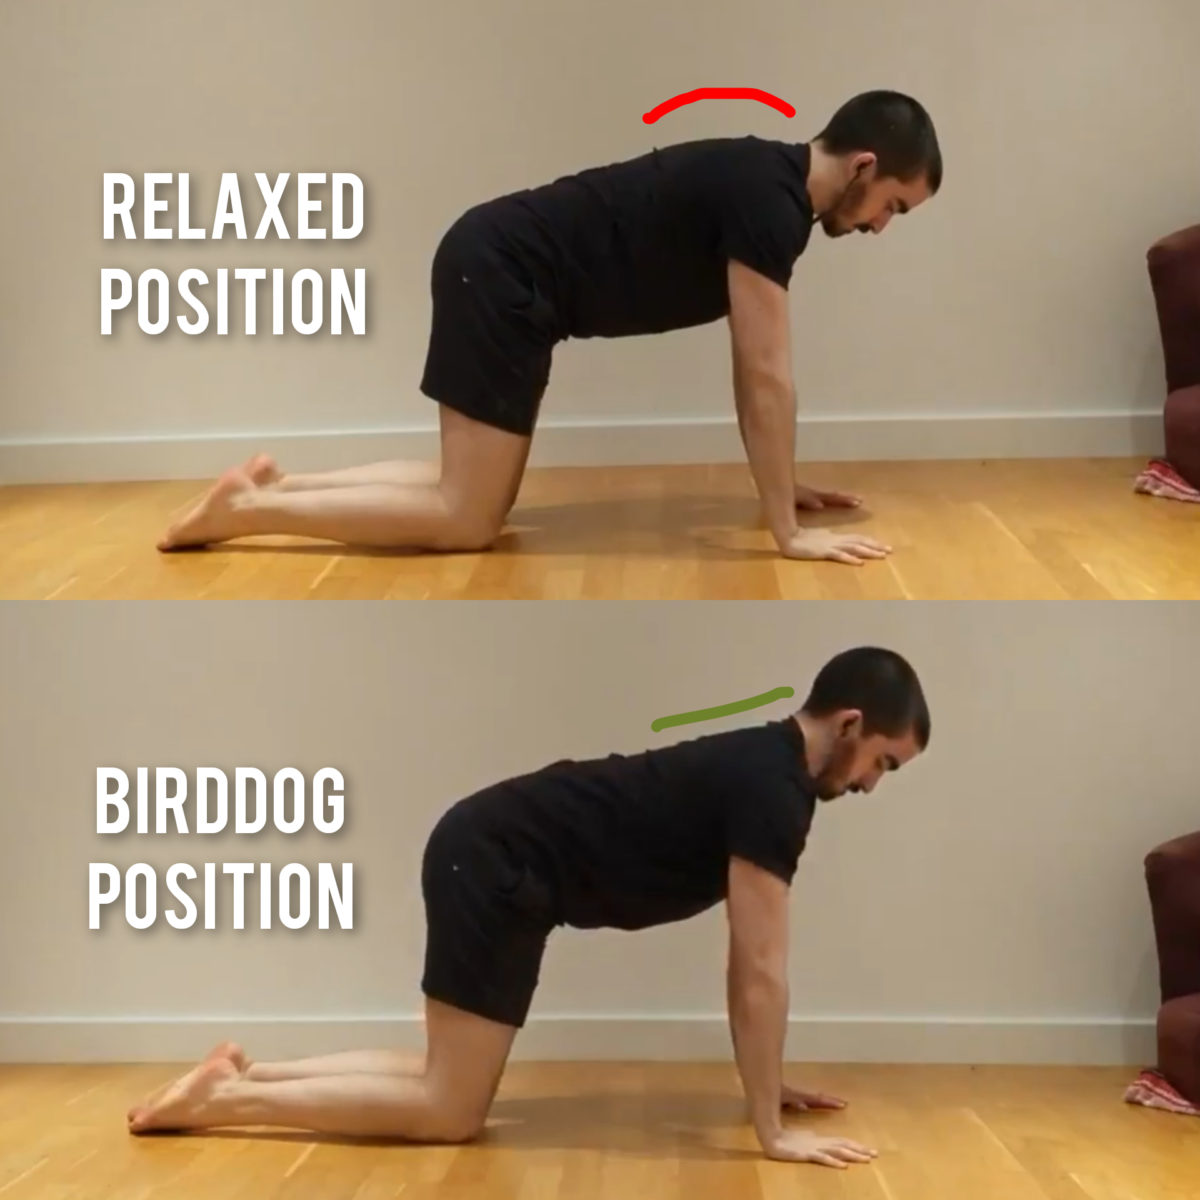
What you should be left with, is your upper thoracic still fully extending, but without the lower thoracic (so your ribs will be ‘down’). Perhaps you’ll even feel a strong sense of contraction on either side of your spine in your upper back. If you feel that, congrats! If not, that doesn’t necessarily mean you aren’t still doing it right; film yourself to be sure. Your upper back should look at least a little flatter than usual.
Here’s a picture demonstrating the difference for me in the above video:
This position is the first exercise in the Birddog progression, and it should be held for time.
Once you manage to successfully enter the position, you should seek to incorporate the ‘brace’ learned in the deadbug to this position to improve its rigidity and stability.
Once you get used to holding this position, try entering it without going through that long complicated set-up process. See if you can setup just by only extending the upper thoracic while keeping the ribs down. If you can, you’ve absolutely crushed it!
Level 2a: Arm Movement in the Birddog (The ‘Bird’ Part)
(Disclaimer: You will notice that in all below progressions, I do not have as significant lower neck extension as I do in the Static hold above. This is because I am able to isolate my upper thoracic extension without needing to do anything with my neck or lumbar due to experience. You should still be doing all the below progressions from the Static Birddog setup as a beginner.)
The first step to integrating your new solid spine position to other movements is learning to move your arms overhead. This is because the body naturally wants to flare the ribs in order to ‘assist’ the arm going as high overhead as possible. If your torso position stays stable throughout a full overhead arm movement, you know you’ve got it down.
Lift one arm off the ground, straighten it out and make a karate chop hand with the thumb pointing upwards, and extend it out in front of you (shown below). Lift it up as high as you can without any rib movement or bending the arm, then return to the floor. Swap to the other arm and repeat.
Level 2b: Leg Movement in the Birddog (The ‘Dog’ Part)
The next step to integrating your snazzy new rigid spinal position to other movements, is learning how to extend the leg up/back without the lower back moving.
Just like the ribs want to flare when lifting the arms to ‘help out’, the lower back will naturally want to extend when lifting the leg behind you. This is where your brace you learned from the deadbug, and that active tail-bone tucking will come in very handy.
Isolating Hip Extension, and Proper Inter-muscular coordination:
Once you are set up in the static hold, extend one leg out behind you until the knee is straight. From here, squeeze the buttcheek of the extended leg, and then lift the leg as high as it will go without any lower back movement.
Importantly, this process should go like a checklist:
- Extend Leg
- Squeeze Butt
- Lift Leg
- Lower Leg
- Relax Butt
- Squeeze Butt
- Lift Leg
- . . . Etc.
This may seem unusual but it is intended to get your glutes used to contributing to the movement of extending the leg, instead of the more common pattern of getting the lower back muscles to do so. Over time this will make the movement easier to do without lower back extension.
Here is a demonstration of it done right, versus a demonstration of it done very wrong.
Incorrect:
Correct:
Birddog Leg Raises (Easier):
Doing the raises as explained above is the ‘easier’ (not necessarily easy) version of the leg movement in the birddog. Get used to this for a number of sessions before moving on to the harder variation below.
Birddog Leg Extensions (Harder):
In this version, the leg is smoothly moving from the ‘all-fours’ position, to fully extended and up. This is hard to do with full range of motion without your lower back jumping in at first, so make sure you’re very confident and confident with the raises shown above, before moving on to the extensions shown below.
Level 3: Putting it All Together
Full Birddog Raises:
Once you are extremely comfortable with both the leg and arm raises, you can combine them, performing the raises on opposite limbs and alternating every rep. (e.g. Rep 1: Left leg, Right Arm. Rep 2: Right Leg, Left Arm.)
Full Birddog Extensions:
This one is for the very committed birddog enthusiasts. Like the difference between the leg raise and the leg extension, this final progression has the limbs moving from the ‘all-fours’ position smoothly into the fully extended and up position.
Join my Discord Server!
If you’ve read this far and still have questions, I’d highly recommend joining my Discord Server! There are plenty of knowledgeable folks there (including me sometimes!) that can answer your questions.
Support the Creator!
If you like my content a lot and want to say thanks to the person that made it (me!), you can send me a one-off or monthly tip on Ko-fi here! Also, I have a premium exercise library hosted on this site with currently 325 exercises in it that you can subscribe to for only £5 per month. If you do decide to sign up, it’d be even better for you than donating anyway, because you get some nice premium content as well!
(ON THE PRESENCE OF ADS ON THE SITE:) I make the majority of my content for free because I simply want to help people as much as I can, and want to make fitness as accessible and easy to understand as possible, but running this site has some costs associated with it and like everyone in this world I’ve got bills to pay! I have had manual donation buttons and optional paid subscriptions on my site for years so I could avoid hosting ads for as long as possible, but the number of supporters to the site has not grown proportionally with increased traffic (and associated running costs from improvements to the site) over time.
Ultimately, that has informed the decision to host ads on the site. In an ideal world, if I were able to get enough consistent supporters to the site, then I could go back to making the site fully ad-free. At the same time I recognise that is not realistic, as a lot of people who appreciate my content the most do so because it is completely free, and would ultimately rather choose a few ads in my articles than having to pay for access.


