Introduction:
For those of you that prefer watching to reading:
The Hollow Body position (also sometimes called the ‘Dish’ position) is easily one of the most important static positions for beginners in calisthenics to learn (followed closely by the Plank, which you can learn about how to do properly here).
In fact, I would argue anyone interested in fitness, and particularly their posture, should know about and be proficient in Hollow holds. For Calisthenics, being familiar with this position is pivotal for understanding how to maintain proper form in almost all movements, from the pushup and pull-up, to more ‘advanced’ movements like the handstand and back lever.
For your everyday average joe with a desk job, the hollow hold works wonders for reducing lower back pain typically caused by prolonged chair sitting, as the movement when done properly helps to release your TFL/hip flexors and lower back, by/while strengthening your abdominal muscles and glutes. If you want to know more about how this exercise and others like it can affect your back pain and posture, google ‘Lower Crossed Syndrome’
What makes the Hollow Position so useful?
The key to this exercise and its application to posture and calisthenics is the concept of a ‘posterior pelvic tilt’. That might sound like a fairly complicated term, but if you are getting into calisthenics, or have any interest in learning about anatomy, it’s a pretty useful term to know.
Let’s break it down so it’s easier to understand. The anatomical reference terms for the front and backside of your body is ‘anterior’ and ‘posterior’ respectively. It might help to remember that by remembering that someone’s ‘posterior’ is another word for their butt. So remember, ‘posterior’ means ‘the butt-side of your body’. So in essence, you are tilting your pelvis towards the butt side of your body.
The opposite of a posterior pelvic tilt, used in the hollow position, is ‘anterior pelvic tilt’, which is when you tilt your pelvis anteriorly (surprise, surprise) and stick your butt out behind you like Donald Duck/an Instagram #fitspo model. Having Anterior Pelvic Tilt (APT) in your natural relaxed standing position is a very common postural issue (again, google ‘Lower Crossed Syndrome’).
One way of easily visualising this, is by imagining your pelvic girdle to be a bowl of water. If you have APT, your bowl of water is spilling out in front of you. If you have Posterior Pelvic Tilt (PPT) then the bowl of water would be spilling out behind you. Also think ‘tucking your tailbone underneath you’.
Before trying any progressions of the Hollow position, make sure you understand how to switch from anterior to posterior pelvic tilt while standing.
How to assume the Hollow Position:
To perform the Hollow hold, lie flat on your back. In a natural lying position you might notice there is a curve in your lower back, that you can slide your hand into, between your lower back and the floor. In the hollow we want to remove this space and firmly press the lower back to the floor. I repeat, if you take nothing from this tutorial but one thing, it’s to keep your lower back firmly pressed against the floor.
The easiest way to do this, is to tuck your knees up to your chest. From there, you can either slowly start to extend your legs out, taking care to keep your abs contracted and your pelvis tilted so your lower back stays on the floor, or you can extend them up and slowly lower your legs.
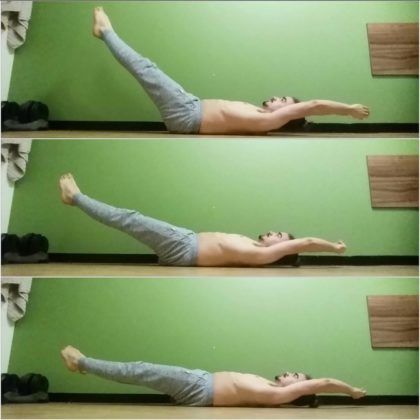
In the final position, your legs will be only a few cm off the floor, your arms overhead, and your lower back firmly planted into the ground.
Progressions:
Very few people, however, will be able to perform the full hollow with good form. Luckily there are two main ways you can modify this exercise to make it easier so you can build the strength to do the full version.
Method 1: Open Tuck – Straddle – Full
This is a method you’ll see being used to progress most static positions in gymnastics. With the hollow, you will start with your knees fully bent, thighs perpendicular to the ground, to get used to maintaining the lower back against the floor.
Once you have worked up to a 30~ second hold with that, you can progress onto holding your legs in a wide straddle. This is getting close to the full movement but in terms of how far the weight of your legs is from your pelvis, it’s still slightly less, so good to bridge the gap between the tuck hollow and full hollow.
Method 2: Increasing Hip Angle
The other method is to start with your legs straight up, and over time, slowly lower them down, from making a 90 degree angle with the floor, to 60, to 30, and then to the final position which is only a few centimetres off the ground.
Potential Mobility Restrictions:
The main thing that will limit most people in achieving the full hollow hold apart from a lack of strength, is a lack of hip extension flexibility. This would be evident in people who find it relatively easy to hold a straight legged hollow hold with the feet far off the floor, but as soon as they lower them closer to the ground, no matter how hard they contract their glutes and abs, their lower back comes off the floor.
If this is you, you need to do some targeted stretching of the hip flexors and TFL. One exercise I have found that is tremendously effective for doing so is found here (CLICK ME!), but exercises such as the dead bug, outlined here (COMING SOON) are also helpful.


Leave a Reply
Your email is safe with us.
You must be logged in to post a comment.