Intro
The Muscle Up. It is many things. For the gymnast, it is the babiest way of ever getting on top of the rings and the one they teach kids because they just can’t do anything cool to get up to the support position yet. For the CrossFitter, it is one of the most advanced movements you ever perform on a day to day basis. Many people in the fitness industry think its more of a party trick than anything, others think its the best thing in the whole world! I mean, you are combining a dip and a pullup and those are both great exercises! Why not combine them into a muscle up?
Anyway, Going on the assumption you think they are good, since you are reading this and want to learn it, lets stop wasting time and get down to breaking down the movement into its main components:
Movement Breakdown:
False Grip Hang:
The ‘False’ Grip:
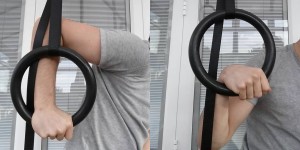
This is one of the most key aspects of form for the muscle up. The False Grip is a very specific and very painful way of gripping the rings to make it possible for you to transition into a dip/support at the top. The reason this is, is because the false grip is literally the support grip but with your elbow below your wrist instead of above it, as shown here:
The easiest way to get into a false grip, is to normally grip the top of the ring on the in-side of the strap, and roll your hand down as shown:
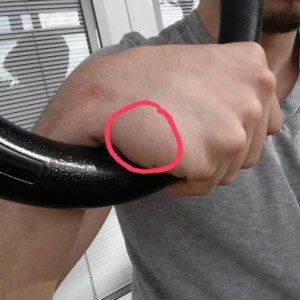
You will want to ensure that in the final position the meaty part of your palm on the pinky side of your hand is sitting on top of/hanging over the edge of the ring like so.
The Hang
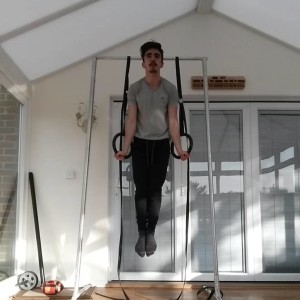
Once you’ve got the false grip down at a conceptual level, its time to actually hang like this. The very first step here would be to hold the false grip in a horizontal row position. You can practice this with bent arms, wrists turned in, and then move to straight armed with wrists turned out. Once you are comfortable with this, the next obvious step is to do the same thing but hanging. If you cannot go straight to a straight armed turned out hang, like before, hang with turned in wrists in a half pull-up position.
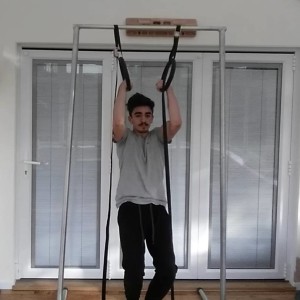
This is more muscularly tiring, but easier to hold the false grip. Don’t spend too long hanging out on this progression and try to get straight arms as soon as you can
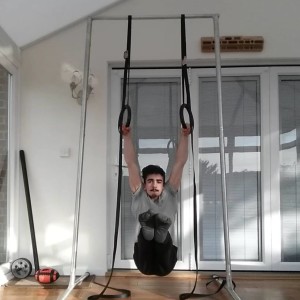
Full hang, maintained false grip but with wrists turned outwards. You don’t need to hang in an L-sit as pictured, I just do so for lack of space
The Pull:
The pull in the muscle up is unlike a normal pull-up in a few key ways. When you pull you should be pulling to the bottom of your chest, rather than to your clavicle area just to get your chin over the rings like a normal pull-up. To achieve this, you need to do a slight arched active hang so you look more like a diagonal line rather than a straight line up and down. You then pull to your chest as low as possible
The Transition:
This is the trickiest bit of the muscle up, but the movement goes as follows: from the chest leant back/feet pointing forwards position with the rings pulled to the lowest part of your chest, you lean forward, so your chest falls and your legs tip and point backwards/down instead, while you pull the rings along your body to your sides and rotate your wrists so you end in the bottom of a ring dip. It’s a lot easier said than done but later in the tutorial I will cover drills you can use to help get the transition. This is the part where the false grip is the key, as if you try the above described action with a normal grip, you will look like a jackass and it won’t work. As shown, you can obviously also do it in an L-sit position, but that’s not necessary.
The Push:
This is just like any ring dip. Keep the rings close in to your body, and straighten out any pike you may have at the top range.
RTO Support:
The turnout signals the end of the rep. This is necessary because it requires straight arms to do, if you haven’t done the full dip portion of the muscle up, all the way up to the lockout which allows you to turnout the rings, you haven’t done the whole movement. You wouldn’t skip a ring turnout on a normal dip, so that’s no different here.
Progressions:
Supplementary Drills/Warm-up:
False Grip Turned out Hang:
You should work up to 3x15s here of a full locked out elbow wrist turned out position, but only do these once you are comfortable with the same sets/time in the row position.
RTO Support
Same here, work up to 3x15s. Obviously if you do not already have a normal ring support, or even a parallel bar support you should do those first as they are necessary prerequisites.
Foot Supported Transition
This is one of the most important drills to help you get the transition, and very easily scalable. When you first start out you should do 3×10 reps (1 rep is bottom of the dip, transition down to the top of the pullup, then transition back to the bottom of the dip) with as much weight on your feet needed to complete that rep range. As you get stronger, take more and more weight off your feet, and start doing it at a consistent tempo for time, rather than in reps (e.g. continuous, well paced transitions for 20 or 30 seconds). The key here is to drill the movement for the transition. The rings should always be as close to your body as possible, and your elbows should be tucked in. Get used to the movement of leaning forward to facilitate the transition. Keep tight.
Strength Progressions:
False Grip Horizontal Rows
Fairly straight forward. Start with a turnout, pull to lower chest, come back down. Work up to 3×10 good form reps before moving on up.
False Grip Chest to Rings Pull-ups
Same as before, start with a turnout, pull to lower chest with a slight arched active hang and come back down. Work up to 3×5 quality reps here. That may not seem like a lot but theres a lot of range for improvement in these, even for those who can already do muscle ups, so focus hard on good form.
Ring Dips (w/ Turnout)
Ring dips here are no different to normal ring dips, apart from potentially going lower in the range of motion than normal. Remember to go as deep as you possibly can, because that’s where you will be after the transition of the muscle up. Work up to 3x10r of these, try to reduce shaking and have a solid turnout and lockout at the top of each rep, and get good depth.
Slow Ring MU Negatives
After foot supported negatives, this is the next great drill for learning the transition. Try to do the transition down as slowly as you can. The dip and pullup negatives are not as important here, but feel free to do them at a good slow tempo as well.
The Muscle Up
When you get your first muscle up, you will undoubtedly want to do lots of them. Firstly, don’t do that. You will get elbow tendonitis. Keep to a max of 3 muscle ups for the first few weeks you can do them and listen to your body. Then you can start adding sets and doing more than just singles. Well done, you made it this far and can now do a muscle up! Congratulations, it’s a very cool skill, but you aren’t done just yet! There are other exercises you can do to further improve your muscle up.
Bonus Drills:
Freehanging Transitions:
This is the grand daddy of all transition drills. For most people, the transition is the limiting factor for their muscle ups, but if you can get up to a point where you can do as many of these as you can do ring pull-ups or dips, you won’t have so much trouble. Caution, however, cos these are heavy on your elbows and you shouldn’t really do these unless you can do about 5 muscle ups in one set, I’d say.
Forward Roll:
This is another way to help the transition, but also another cool skill you can learn easily if you already have the muscle up. You essentially just tip yourself forward, keeping the rings tight to your body, and do another transition once you are under the rings again. Try this once you can do 3×5 freehanging transitions without issue.
Hope you enjoyed that and learned something good to help you move one step closer to your goals!
If you enjoyed that, check out my newsletter, facebook and instagram!
www.facebook.com/nickebodyweight


Leave a Reply
Your email is safe with us.
You must be logged in to post a comment.