Deadbug:
The Deadbug is without a doubt, the single most important core exercise out there, in my opinion. Through the process of learning and improving in deadbugs over time, you are not only:
- Working out ‘your core’,
- You will also be learning a lot about how to breathe properly (the way your body is “meant” to) and how that is related to core Activation
- AND most importantly, you will learn how to coordinate all of your core muscles together to stabilise your mid-line (i.e. your spine and everything that moves when it moves) against resistance and even when your limbs are moving, which is incredibly important for bodyweight exercise and barbell training alike.
This process is referred to as ‘Bracing‘.
As far as comparing that to the benefits of any other core exercise (which pretty much only ticks box #1 in 99% of cases), Deadbugs absolutely crush it in that respect. Not least because learning to brace makes every other core exercise you’ll ever do more effective. It’s for this reason that I program some version of this for almost every client I have, as well as why it is one of the two fundamental core exercises in the BWF Primer (Click) program, which is a program for beginners to start doing bodyweight exercise.
Very Important Note Before You Start:
It takes a long time and a lot of practice to refine your control of your breathing and develop a fine and articulate command of your individual core muscles, so the sooner you start learning it in your journey, the sooner you can reap the benefits of it being performed correctly.
From the perspective of getting the most out of this guide, even though the majority of what’s happening is very ‘internal’ and thus won’t be so capturable on camera, it would still be in your best interest to film yourself trying all the practical exercises in this guide out and watch them back as you read in order to consolidate the information better. (Don’t worry if you don’t have a tripod to frame yourself up, you can just prop your phone against something and use the front facing camera to frame where you will be standing.)
Also, all of the detail in this guide may very well feel like an overwhelming amount of information to you to begin with. Do not worry, this guide is only so detailed because it has to be, and not everything needs to be absorbed and perfectly replicated on your very first read through. Without incorporating all of the components of the below guide, you are leaving a vast majority of the benefit of this exercise on the table. You will almost certainly need to come back and read this guide many many times as you learn.
Controlling your Breathing:
So to kick this guide off we need to discuss breathing.
…Why?
Your core muscles are, among many things, breathing muscles. You can’t truly learn how to control your ‘core’ without learning how to control the breath.
The most important muscle in the ‘core’ involved in your breathing is your Diaphragm. If you imagined the lungs like a box, The diaphragm is the floor of that box. It is shaped like a cup turned upside down when it is relaxed, and when it contracts, it flattens out and moves downwards, increasing the volume of your lungs, causing air to rush in. That might be hard to visualise, so have a look at the below video:
As you can see, when the diaphragm contracts, it causes the whole abdomen to expand (in every direction, 360 degrees, not just the front; this is an important note for later). This is in part because the downward movement of the diaphragm pushes on and compresses the organs, which need to go somewhere, so they go out in all directions.
(P.S. Unfortunately, despite the slightly suspect animation of the above gif, breathing will not make your butt bigger. Bummer. Literally.)
This means if you breathe and you are not creating an expansion in the abdomen in 360 degrees, your diaphragm is contracting poorly, and incompletely.
If your diaphragm is contracting poorly/incompletely, other muscles referred to as your accessory breathing muscles have to pick up the slack. These muscles exist to essentially assist the diaphragm to get a little extra air when you really need it (i.e. if you’re sprinting for as long as you can), by expanding the very top of the ribcage. However, they are really not well adapted to doing most of the work required to breathe, all the time, day in and day out. For many people, excessive accessory breathing can cause issues like tension headaches, shoulder issues and more. Not to mention far poorer core control (the whole point of this guide!)
So naturally for our very first step, we are going to practice breathing only from the diaphragm, without making those accessory muscles do any work.
To do this, lie flat on your back with your knees up (you can also put your legs up on a chair, or your bed).
Place one hand on your upper chest (just below your neck, around your collarbones) and the other between the bottom of your ribs and your belly-button.
Now try breathing, just normally as you would. What you might find is any of the following:
- Your upper hand moves up as you breathe in and down as you breathe out, but your lower hand does not (This means your accessory breathing muscles are working far too hard, and your diaphragm is working extremely inefficiently)
- Both your upper and lower hands both move up and down as you breathe in and out (The diaphragm is working more but the accessory muscles are still working when they shouldn’t)
- Your lower hand moves, but your upper hand does not (The diaphragm is working well, and the accessory muscles are relaxed as they should be)
We are aiming to achieve the third outcome there: The bottom hand should rise and fall as you breathe, but there should be no movement in the top hand, as seen below:
Practice this now.
You may need to practice this for 5-10 minutes or even more to achieve this consistently, or you may be able to do it immediately. In any case, work on this until you can, then move on.
(Extra credit: if you can do this perfectly, place both hands on the sides of your lower back and try again. If you can create expansion here too, your diaphragm is really firing on all cylinders, so to speak.)
The ‘Extrinsic Core’ Muscles:
These are the visible muscles of your abdomen. They are not really as important for bracing/midline stabilization, but it is important to know what they are an how they work, so you can differentiate between them and the important ones coming next, to learn how to use them.
The ‘Six Pack’: Rectus Abdominis
This one is the easiest to control, but is unfortunately the least useful when it comes to abdominal bracing, and thus is not very important on our quest for mastering mid-line stabilisation.
How to contract it:
To contract this, you can just think about tensing your midsection like someone is going to give you a hard thwap on the stomach. In fact, you can try that out. Relax your stomach completely and give yourself a soft wack, then tense and try again. If it’s much harder this time, congrats! You’re contracting your Rectus Abdominis.
This is the ab muscle that will most likely be (erroneously) taking over the action when you first try to brace/do deadbugs, and will become progressively less and less predominant as you develop the ability to consciously use the others to great effect.
The External Obliques:
These are the muscles on the sides of your abdomen, they help you to twist, and bend side to side (like a little tea-pot). They also help to resist twisting and side bending. They’re not very relevant for this guide.
(Two of) The ‘Intrinsic Core’ Muscles
In case that header title for this section threw you for a loop, there are actually four (five) muscles in the ‘intrinsic’ core:
The diaphragm, the transverse abdominis, the pelvic floor, and the multifidus (and the internal obliques*).
However, the pelvic floor and the multifidus are not actually relevant to doing deadbugs, so we will not be covering them.
(*Technically speaking, the internal obliques are not in the intrinsic core as most people classify it, but for all intents and purposes I treat them as though they are, due to their pivotal importance in bracing and midline stabilization)
The Internal Obliques:
The Internal Obliques are a super important muscle for controlling the position of the bottom of your ribs, pulling them down and flat onto your body when they both contract at the same time. Not only that, they do so without tensing the front of your abdomen (so the belly can still move, if needed, for a diaphragm happy in-breath, without losing the rib stability)
For reference as to what I mean by rib position, note the below photo:
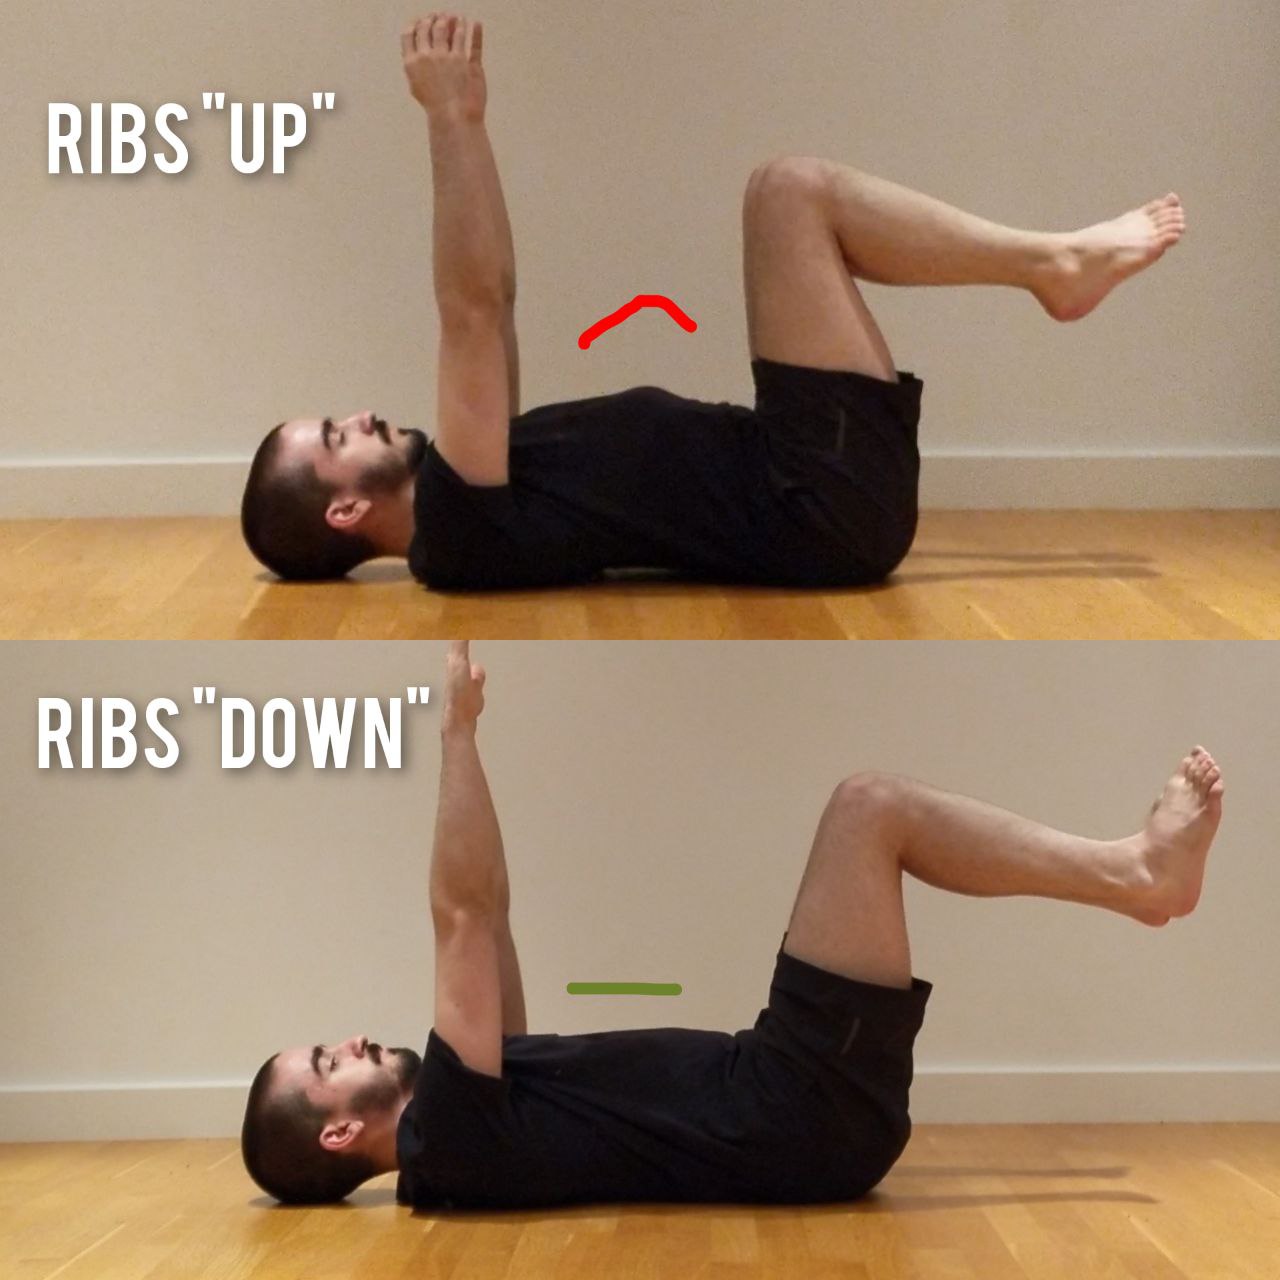
Importantly, you can shove your ribs down using either/both of your internal obliques and rectus abdominis. However it is imperative that you learn how to do so with your internal obliques, as doing so will allow you to continue to breathe primarily with your diaphragm, as it will not tense the front of your abdominal wall, so some degree of forward expansion will still be possible, making breathing easier without relying on your upper ‘accessory’ breathing muscles such as the scalenes and pec minor (which can cause issues for your shoulders down the line if overused).
Not only that, but it will allow you to keep the ribs down without doing a ‘crunch’. This is important for keeping a good bodyline, where you need to keep your ribs down while also setting your upper back as extended/straight as you can (most exercises, frankly).
How to Contract it:
Cueing the internal obliques to contract on someone that’s never used them before is exceptionally hard to do over the internet. However, the best way I can communicate it is: Try to draw the sides of the ribcage closer together. If your abdomen is relaxed otherwise, this may push your belly out a bit, and even make you breathe out slightly. When/if you believe you have successfully done so, maintain it, and try to flare your ribs out. If you cannot, but instead you simply stand up straighter, congrats! You are using your internal obliques.
Another test you can do (which is especially useful in making sure you are truly using your internal, and not external obliques,) is to very gently push your fingers about 1cm into the sides of the bottom of your ribcage, while you do the above exercise. If your sides push out and your fingers meet tension, your external obliques are working. If your sides draw inwards, your internal obliques are working.)
NOTE: WHEN YOU FIRST START LEARNING TO BRACE, THIS MAY WELL BE IMPOSSIBLE AT FIRST. IT IS OK IF YOU START BY USING YOUR RECTUS ABDOMINIS TO LEARN HOW TO BRACE WITH TENSION, THEN OVER TIME LEARN TO KEEP THE RIBS DOWN WITH THE INTERNAL OBLIQUES WHILE STILL BREATHING INTO THE BELLY
The Transverse Abdominis:
The Transverse abdominis is the deepest of the ‘ab’ muscles, and is functionally speaking, the antagonist of the diaphragm (this means it does the opposite function to the diaphragm while bracing). You can create a great deal of stability in your spine by contracting them both against each other, like creating an internal tug-of-war that prevents your spine from moving.
To learn how to use the transverse abdominis is (thankfully) MUCH easier than learning to use the internal obliques.
Lie down, same as before, this time take the index and middle fingers and find the pointy hip bones that stick out on the front of your pelvis. (Shown below)

Once your fingers are there, move both of them inwards towards the centre by around 2-3cm. You should be right on the very lower part of the belly now; just below and well to either side of the belly button. Push in here a little bit.
This is where the transverse abdominis is closest to the surface of the body, and so will be easiest to tell when it contracts, as it will tense up here.
From here, try to pull your belly button in, as though you were trying to get your belly button to touch your spine, or trying to fit into a pair of jeans that’s just a bit too small for you. Very importantly, you should be able to do this without your ribs lifting up. This is demonstrated visually in the photo below.
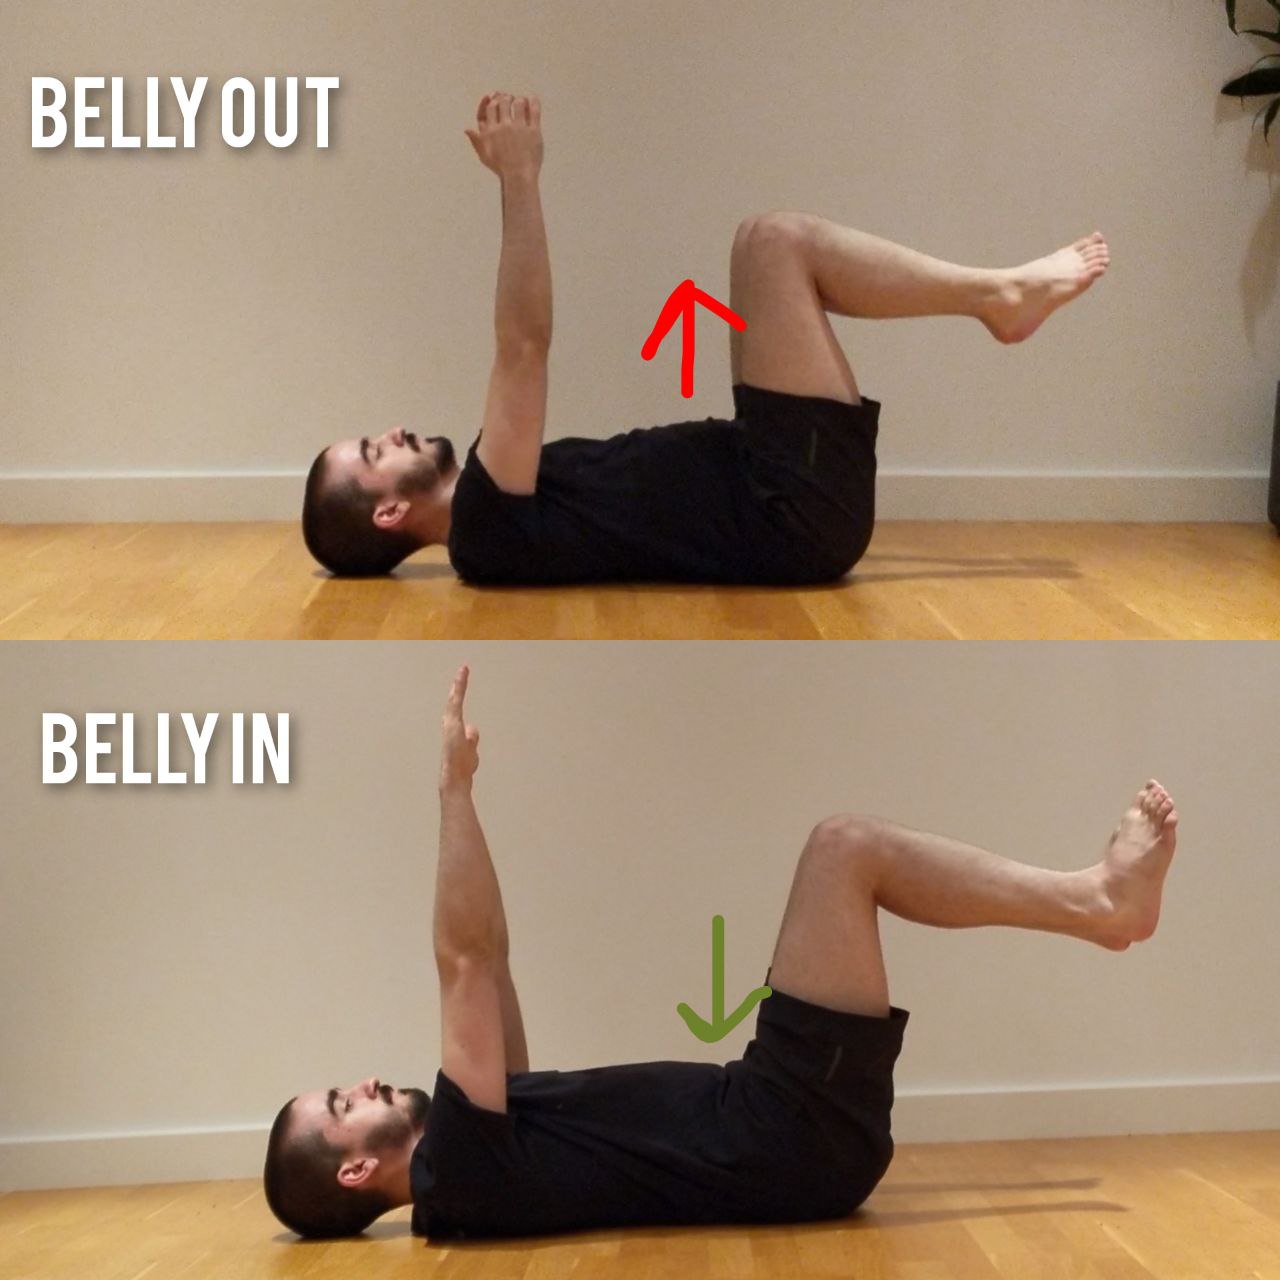
If you struggle to do so without the ribs lifting up, try again, slowly, while breathing out like you’re tryin to fog up a window.
In either of those scenarios (i.e. breathing out, or not), if you feel the parts of your belly that you are pressing into tense up, CONGRATS! You have just contracted your transverse abdominis.
Bracing and the ‘Static Deadbug Hold’
So now that we’ve got ALL that information down, we can tie it all together with the brace.
The brace is, essentially, contracting almost everything all at once, so to brace, we will be simultaneously:
- Pushing the belly (and sides and back, if you’re good) out with the diaphragm (Full Brace Only*)
- Pulling the belly in with the transverse abdominis
- Drawing the sides together with the internal obliques
- Bringing the ribs down with the internal obliques, and optionally the rectus abdominis depending on the type of brace (or, at first, likely only the rectus abdominis)
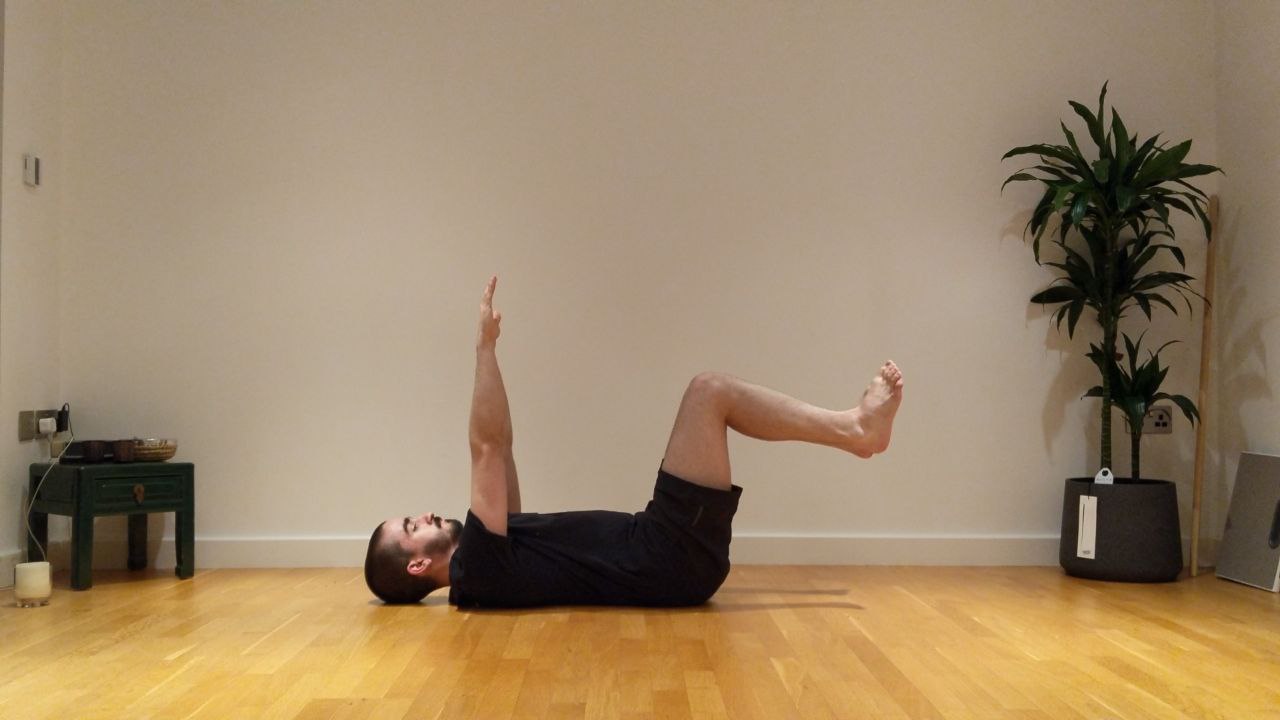
We will be using the brace, finally, right now for the main event! The Static Deadbug.
What deadbugs are, is an attempt to challenge the strength of your brace by using the weight of your limbs. If you were unbraced completely in this following position or any of the progressions, the force of the gravity of your limbs would pull your lower back into an arched position. It is the strength of your brace that prevents that.
The first way we will do this, while lying down, is by bracing, and then lifting the legs up to 90 degrees as shown here. The arms can either come up as well (looks like a dead bug!) or stay down by your sides. (Don’t worry, this will ALL be summarised below)
What’s happening here is that the gravity of your legs in this position will make your back naturally want to extend to lead them to the floor, but your brace will have to work hard to prevent that.
The first progression of the deadbug as an exercise, is simply holding this position for time.
A very important point about the brace you do during deadbugs, to ensure maximum effectiveness of the exercise, is that its should be what’s called an ’empty brace’. The difference between this and a ‘full’ brace is explained below.
‘Empty’ vs ‘Full’ Brace:
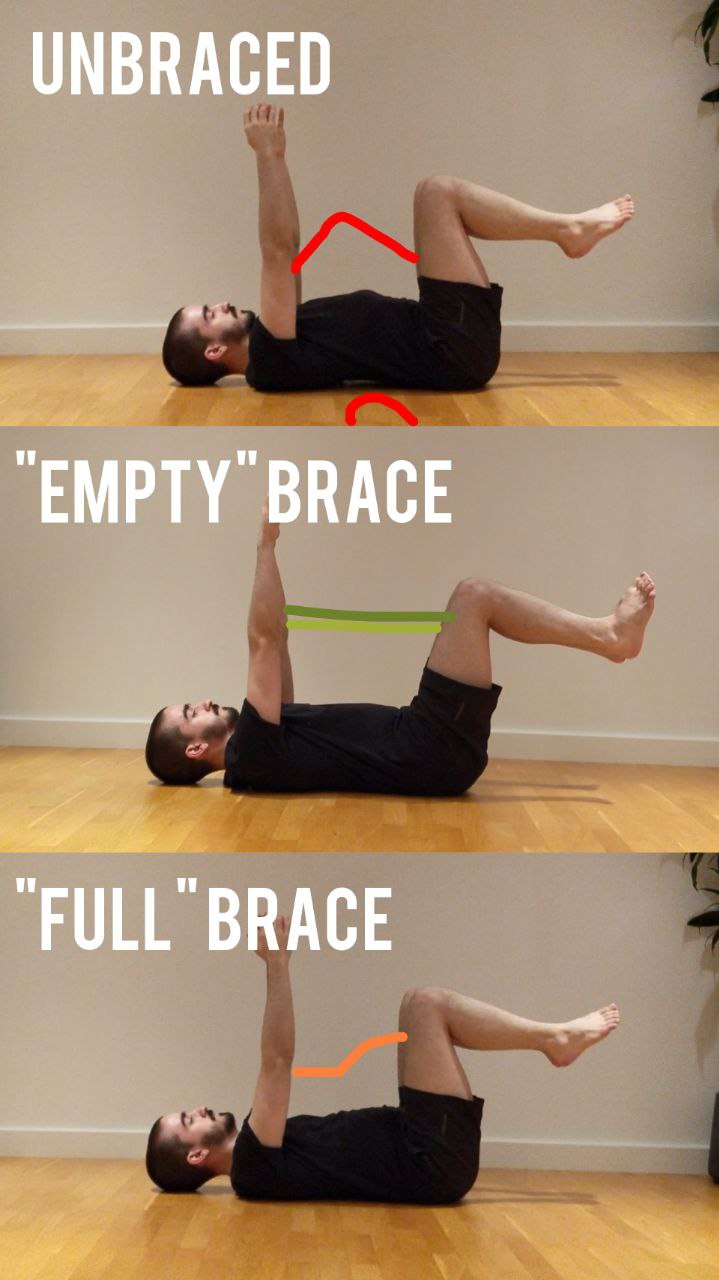
So the terms ’empty’ and ‘full’ brace refer to whether you are bracing with air in your lungs or not. They serve different purposes, so are applicable in different scenarios.
Full Brace:
The ‘Full’ Brace is used during scenarios where you are manipulating vey heavy external loads, such as barbell training, picking up a sofa, or a heavy box. This is because in lifting heavy loads, it is very important (not only for your ability to express your strength to its fullest ability, but also for the safety of the movement on your back) that your spine stays rigid and unmoving in its chosen position. By having some air in your lungs, it really gives something for the brace to ‘bite down on’, so to speak.
The best way to explain this is with the analogy of a can of soda. If you push into the side of an open or empty can of soda, the can deforms very easily. You could probably bend it in half if you wanted to. This is what your back is like when you are not braced.
However, if you tried to push into a closed can of soda, it would be much harder. This is because the liquid, and the gas inside of it, is pushing outwards against the walls of the can, stabilising it. That’s what a brace is like.
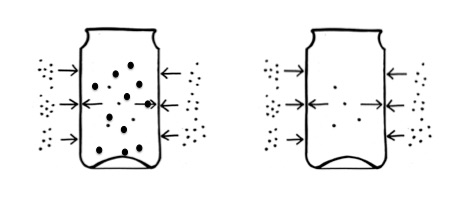
A FULL brace is like if you tried to push your thumb into the side of a can of soda you had just vigorously shaken up a few moments prior. All the gas has escaped from the liquid, and is pushing HARD against the can. You couldn’t dent that sucker if you tried.
This was a very extended way of telling you that if you’ve got a good diaphragm-driven breath of air in your lungs, that means you can brace much harder, and you will be able to withstand much higher loads on your back without losing your rigid position and stability.
The Full brace is the brace where you will be able to contract your rectus abdominis as well as everything else, just to get a little extra tension generated.
(N.B. Some individuals that routinely lift very high loads (such as some powerlifters and strongmen) may choose to augment this effect even more with weightlifting belts; very wide rigid belts that they can push their stomachs out into in order to brace with much more force than their ab muscles would be able to match to balance out, creating a much greater level of spinal rigidity than could be achieved without.)
Empty Brace:
Now an empty brace takes the above concepts and uses them against the core muscles in order to force them to work harder. By bracing with absolutely minimal air in your lungs, your core has to contract and compress so much harder to find even 1/10 of the stability and tension. This makes it a great ‘proving grounds’ for your core muscles. This is how deadbugs, as well as almost every other core exercise you do will be performed. You can think of it like the opposite of training wheels. A full brace is like walking uphill for your core. An empty brace is like walking uphill, dragging someone that’s holding on to your ankles, for your core.
Try it. Brace, and then breathe out all your air, squeezing harder and harder as you go, like you’re wringing out a towel. Alternatively, breathe out for as long as you can til there’s just no air left to go, then brace as hard as you can, for as long as you can.
This is where the insidious difficulty of the deadbug comes from, and its where most people who say “this exercise is easy” will be going wrong.
Side Note:
Importantly, you can still breathe during a proper empty brace if you can keep your ribs down using your internal obliques only, as it will allow forward belly expansion. However, the breaths should be very shallow and light. As you do this, every time you breathe out, you can ratchet the brace a little tighter by squeezing all the air out, drawing the ribs more in, and drawing the bellybutton more in. This will actually help you to maintain tension as your core fatigues.
If you cannot yet achieve this, and can only keep the ribs down using the rectus abdominis you will either have to hold your (lack of) breath during the deadbug, OR if you can breathe into your sides and lower back, you can take little sips of air seeking only to expand there.
Summary: Performing the Static Deadbug
So to summarise (because that was a LOT of information, I apologise) to perform the first progression of the deadbug, the Static Deadbug Hold:
- Lie on the ground, with your knees up and feet on the floor just in front of your butt, relaxed.
- Take a nice deep diaphragm-driven breath in, and then start to breathe all your air out like you’re blowing out through a big straw
- As you are breathing out, start ratcheting up the tension in your brace, engaging all the core muscles as we outlined above:
- Ribs Down (Rectus Abs and/or Internal Obliques)
- Belly in (Transverse Abs)
- Ribs Narrow/Together (Internal Obliques)
- Once you are fully tense and fully out of air, you can lift the legs up to 90 degrees, and start taking little sips of air, expanding mostly into your sides and back, but also potentially into your belly if you have that degree of control over your internal obliques. If you can’t yet do either, sorry you’ll have to hold your breath or else you’ll lose tension.
- At no point should your lower back lose gentle contact with the floor. It should not be pressing hard into it, but it also should not be arched.
Progressions:
So once you have well and truly mastered the basic, static deadbug, You can begin to move the limbs in a variety of ways to challenge the strength of your brace even further.
A Note on Difficulty in Core Exercises:
You may find at some progression that you start to feel the muscular effort and tension more-so in your lower back muscles than your core. This means the difficulty of the exercise you have chosen, or the number of reps you have performed exceeds the capability of your intrinsic core muscles (mostly your transverse abdominis). This is a good marker for appropriate intensity. If you feel this, make it easier.
One/Both Arm Deadbug Extension:
This variation of deadbug is useful for individuals who struggle not to flare their ribs in things like handstands, overhead presses, and such. Simply moving the arms does not increase the challenge of the brace by much, which is why this is the lowest progression level. Below you can see how, if you have limited overhead Mobility the brace will prevent you from compensating with rib flare to get all the way overhead, and will provide a more honest representation of your current Mobility level. Conversely, if you have a very weak brace, then simply moving your arms as far overhead as you can will involuntarily cause your ribs to lift in order to compensate. (See Below)
Incorrect:
Correct:
90 Degree One Leg Deadbug Extension:
This is the first “real” progression of the deadbug from the perspective of challenging your core strength (rather than coordination, as with the above progression).
In the braced, static deadbug position, keeping your legs locked at 90 degrees of knee bend, slowly lower one leg down until the heel gently touches the floor, then return it to the start position. Repeat with the other leg, that’s one rep.
One Leg Deadbug Extension:
For the next progression, starting in the braced static starting position, slowly extend one leg out, reaching your heel far out and down until your leg is straight. In a scenario of ideal hip flexibility, you should seek to reach your calf to the floor (depending on the size of your calf, your only your heel may touch as mine does, this is fine). If your hip flexibility is limited, only lower the leg as far to the floor as you can without losing your mid-line position (i.e. without your lower back arching to compensate).
As above, both legs move for one rep.
Opposite Limb Deadbug Extension (AKA ‘Marching’ Deadbug):
Further difficulty can be added by mixing the arms and legs movement, performing opposite extensions every rep (e.g. left arm extends out, so right leg extends out, and vice versa). This is a great combination of a coordination, positional, and strength challenge.
Both Leg Deadbug Extension:
For further challenge to the core, both legs can be extended at the same time.
Note, difficulty increases exponentially here, so if you find your lower back arching and leaving the floor as in the below footage, you have FAR exceeded your strength capacity here, and should go to an easier progression.
Incorrect:#
Correct:
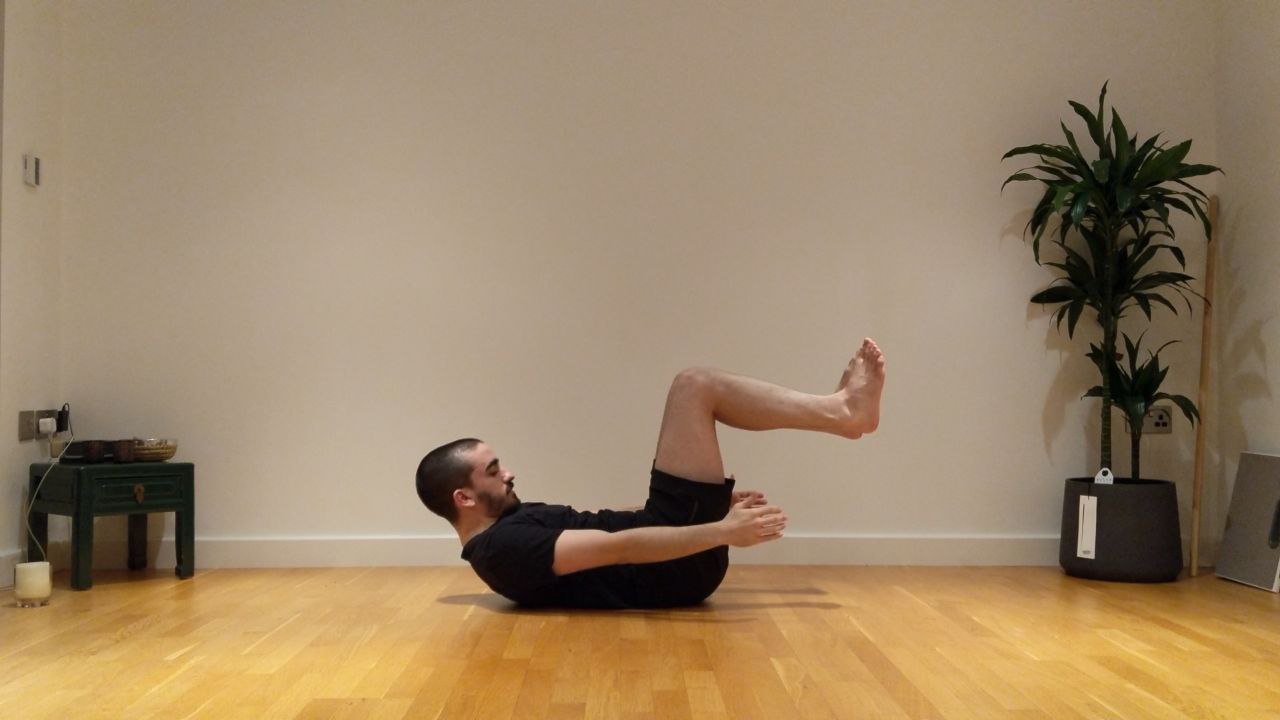
Deadbug Lay-outs:
The final progression of the deadbug before you start to add external weight in the hands and feet is the Deadbug Lay-out. Both arms, both legs.
Is this not just a ‘Hollow Hold’?
If you are familiar with bodyweight fitness or gymnastics strength training, you may know of a common gymnastics core conditioning exercise known as the ‘hollow body hold’. Many people I’ve come into contact that fit this description are perplexed by the deadbug, often saying ‘so, basically a hollow hold, right?’. If you were to look at the starting progression of both, you would see they’re quite similar.
Starting Hollow
Starting Deadbug
Indeed, if you were not priorly educated about the significant differences between the deadbug and hollow body hold, you would be forgiven for thinking they’re basically the same thing due to the ostensible visual similarities, or for thinking, “Why not just do hollow holds?”.
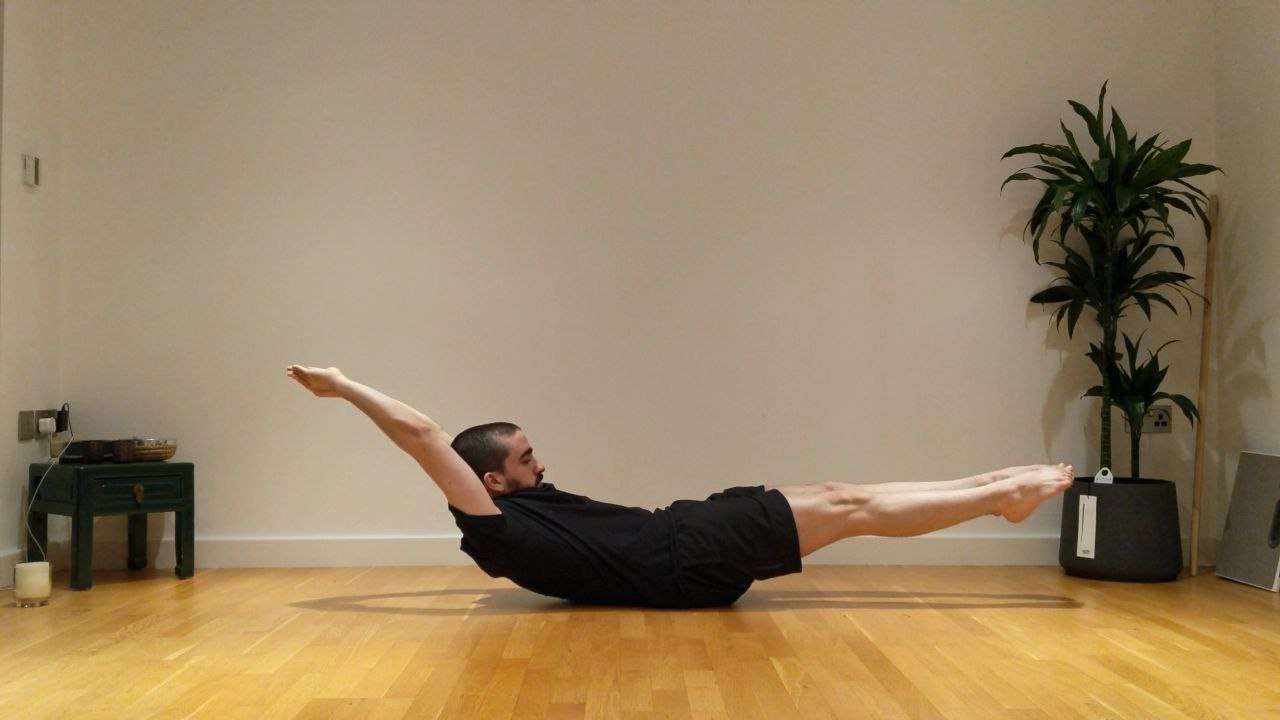
However, when investigating their purpose, their internal cues, and their full end progressions, you can see a stark difference between them:
Full Hollow
Deadbug Layout
So looking at the end position, you can see that the hollow aims to achieve what is called a ‘globally flexed’ position, as it is one of the two fundamental body shapes (The other being the ‘Arch Hold’, a globally extended position) that a gymnast needs to be able to maintain under high speeds of tumbling and flipping though the air in various apparati events.
This globally flexed position and lack of focus on internal cueing in favour of focus on external shape and rigid tension from the tips of the fingers to the tips of the toes means this exercise predominantly works the rectus abdominis, like many other core exercises.
Conversely, deadbugs are an exercise in full, complete, coordinated core bracing in a neutral (or slightly flexed in the lower back) spine position. The focus is very much on the brace, not necessarily on the shape, there is little to no tension in the limbs, and it is performed with an ’empty brace’ to maximally challenge the core. It is also not simply enough to replicate the look of deadbugs; if the transverse abdominis, or the internal obliques are not properly contracting for example, the deadbug is not being properly performed because the brace is not complete or coordinated.
The End!
Thanks for reading all this way! I wish I could have written it more simply, but unfortunately deadbugs are a complicated exercise. The upside is if you take the time to truly understand it all, you ill be gifted with one of the most effective core exercises you will ever do in your life, that will massively enhance the effectiveness of any other core Isometric you’ll ever do, as well as your lifting performance.
Cheers,
Nick-E
Join my Discord Server!
If you’ve read this far and still have questions, I’d highly recommend joining my Discord Server! There are plenty of knowledgeable folks there (including me sometimes!) that can answer your questions.
Support the Creator!
If you like my content a lot and want to say thanks to the person that made it (me!), you can send me a one-off or monthly tip on Ko-fi here! Also, I have a premium exercise library hosted on this site with currently 325 exercises in it that you can subscribe to for only £5 per month. If you do decide to sign up, it’d be even better for you than donating anyway, because you get some nice premium content as well!
(ON THE PRESENCE OF ADS ON THE SITE:) I make the majority of my content for free because I simply want to help people as much as I can, and want to make fitness as accessible and easy to understand as possible, but running this site has some costs associated with it and like everyone in this world I’ve got bills to pay! I have had manual donation buttons and optional paid subscriptions on my site for years so I could avoid hosting ads for as long as possible, but the number of supporters to the site has not grown proportionally with increased traffic (and associated running costs from improvements to the site) over time.
Ultimately, that has informed the decision to host ads on the site. In an ideal world, if I were able to get enough consistent supporters to the site, then I could go back to making the site fully ad-free. At the same time I recognise that is not realistic, as a lot of people who appreciate my content the most do so because it is completely free, and would ultimately rather choose a few ads in my articles than having to pay for access.
Leave a Reply
Your email is safe with us.
You must be logged in to post a comment.