Important Note: This guide was written in Jan 2018 and is a little bit outdated, and missing some key information relative to how I coach overhead Mobility nowadays. However, the below guide is still decent info and should at least get you started! If you want to learn even more about improving overhead Mobility, sign up to my Mobility Library for £5/month and check out the ‘Shoulders’ Section.
If you are a fitness enthusiast, especially if you are into handstands, overhead press, olympic lifting, or anything involving putting your arms over your head, you’re probably well acquainted with the importance of having proper overhead Mobility. By this I mean the ability to get your arms over your head without flaring your ribs out and arching your lower back.
If you’ve already done some research into improving overhead Mobility, you’ll know that stretching stuff like your lats and pecs is gonna be pretty important to loosen up in that range and get your arms further overhead. However, this is actually only a very small part of the picture.
Overhead Mobility can be effectively broken up into 2 very broad sections. Humeral and Scapular Movement. If you refer to your arm being perfectly overhead as 180 degrees, only 120 degrees of movement actually comes from moving your arm, whereas the other 60 degrees comes from the movement of your scapula (Approximate and somewhat variable). The Coordinated movement of your scapula with your humerus (upper arm) to get all the way overhead is referred to as ‘Scapulohumeral rhythm’. If you have poor scapulohumeral rhythm, you could have all the lat and pec flexibiltiy in the world but still not have 180 degrees of overhead Mobility. Thus, improving your scapulohumeral rhythm is integral to improving your overhead position.
If you have not done any research into overhead Mobility, and all of the above sounded like gibberish to you, the following sections will outline in detail how to improve both sections of your overhead Mobility.
If at all possible, I will try to keep this as equipment-less as possible, but certain things could be enhanced or made more effective with some things if you have them.
Here’s a follow along video of all of these exercises in full:
Humeral Mobility:
The two biggest limitors of humeral overhead Mobility are the pecs and lats (Pectoralis Major and Latissimus Dorsi).
Pec Mobility:
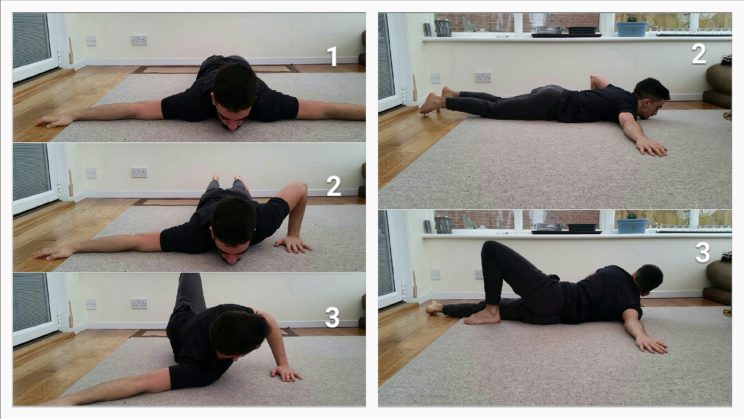
Lying Pec Stretch. This is the easiest, chillest way to stretch your pecs.
To do this, lie flat on your stomach, with your arms outstretched (1). Then, place the arm not being stretched flat as though you were going to do a pushup (2). Roll your body so you are facing away from the stretched arm and tuck your bottom leg up to your chest (3).
Your chest will be tighter at different angles, so play around with angles between having your arm perpendicular to your body (like a T), all the way up up to having your arm almost overhead (like a Y). You’ll find quickly where you are tight and where to focus.
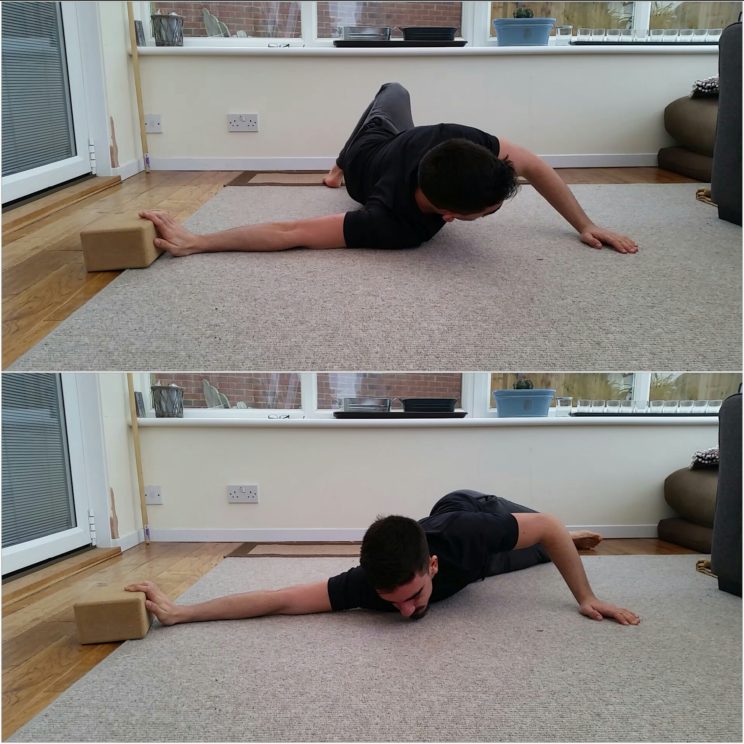
If you want to intensify this stretch to work in a way that may be described as including a fascial component to the stretch (as it was first taught to me by a friend*), you can do it against a wall or with your hand propped up onto a block, and internally rotating your shoulder (trying to get the elbow to point to the sky). This will stretch the superficial front line, which basically means you’ll be experiencing a much more intense pec (And also bicep, among other things) stretch that if you don’t feel in your chest, you will probably feel most strongly in your middle finger or bicep. (doesn’t mean it’s not still effective for the chest). It’s crazy stuff, but try it for yourself and you’ll see how effective it is.
(*Whether the actual mechanism of this stretch or ANY stretch is actually enacting any meaningful changes on the structure of the fascia is unclear, but the stretch itself in the experience of myself and those that I have coached has been seen to be more effective nonetheless. The exact mechanism behind it is not clear)
Lat Mobility:
Lat Stretches are a funny one in my opinion. Anecdotally, it has taken a long time to find stretches that really work the right spot, so I will give a variety of examples for how to stretch the lats. They all follow one basic principle. Getting your arm overhead and ‘across your body’, and lengthening that side of your body as much as you can (because the lats attach all the way down at the low back and pelvis, so you bet some pelvic movement will affect the intensity).
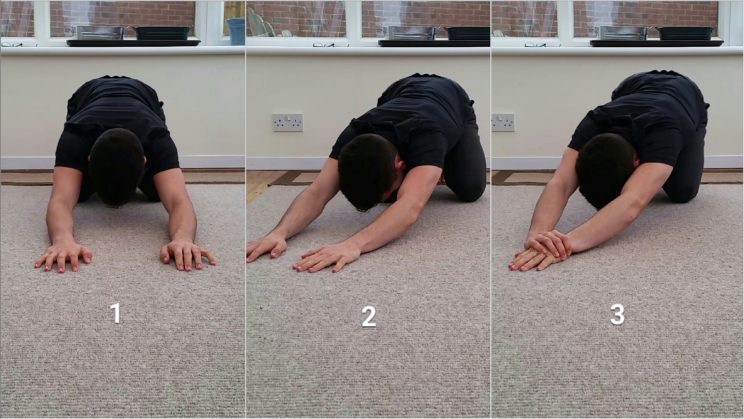
The easiest is this ‘child pose’ lat stretch. To do this, curl up like a ball and sit on your heels, with your head resting on the floor, arms outstretched in front of you. Walk your hands to one side, and out a bit so your butt comes off your heels. Now, if you walked your hands to the right, put your right hand over your left hand and push it into the ground to stabilise it, then relax and let your weight try to pull your butt back onto your heels.
Some people might find a good stretch here. Some might not. If you want to intensify the stretch here’s a series of things you can do:
- Tuck your tailbone
- Push the hand away harder
- Lengthen out the side being stretched by crunching in the opposite side
- Walk your hands out even further to let gravity help out
If you want an even more intense stretch, here’s a great one, but it needs a table or counter top.
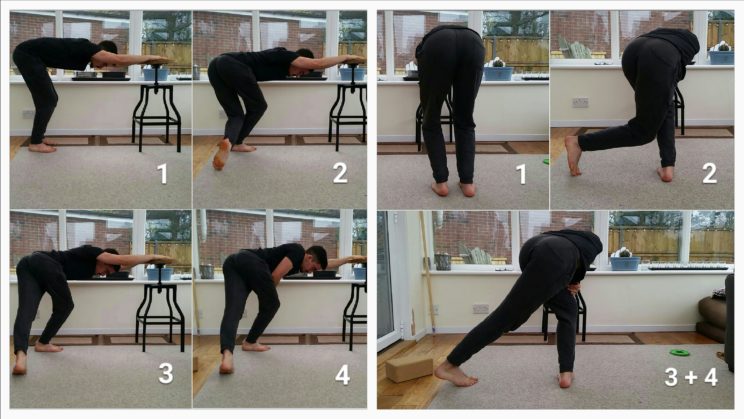
To do this one, put your hands on the surface and push your chest through to get your arms overhead. From here, take the same side leg as the arm you’d like to stretch, with it bent, put it behind and far past the other leg, so that from your arm to your leg your body makes a crescent moon shape. Once you are here, straighten your leg. Should feel fairly intense, but if you don’t feel it enough for your liking, you can do the following:
- Both tuck and tilt the pelvis to the opposite side
- lean into the side of your arm
- put your leg further away before you straighten
- Take the other, not stretched arm off the table
If at any point you feel these as pain in your shoulder or a physical blockage in your shoulder instead of a lat stretch, you need to focus more on the below sections to get your scaps up to scratch before you start stretching.
Scapulohumeral Rhythm:
Rotator Cuff Mobility/Stability:
The rotator cuff plays an important role in overhead motion in making sure that the humerus stays located centrally in joint socket as it moves overhead, keeping it totally free of all the numerous fragile structures around it. If there is an imbalance in the rotator cuff, then as the arm moves overhead, the humerus moves out of its safe, centralised location and that’s when the crunch and grind and pinch occurs.
External Rotators:
First we are going to look at strengthening the external rotators.
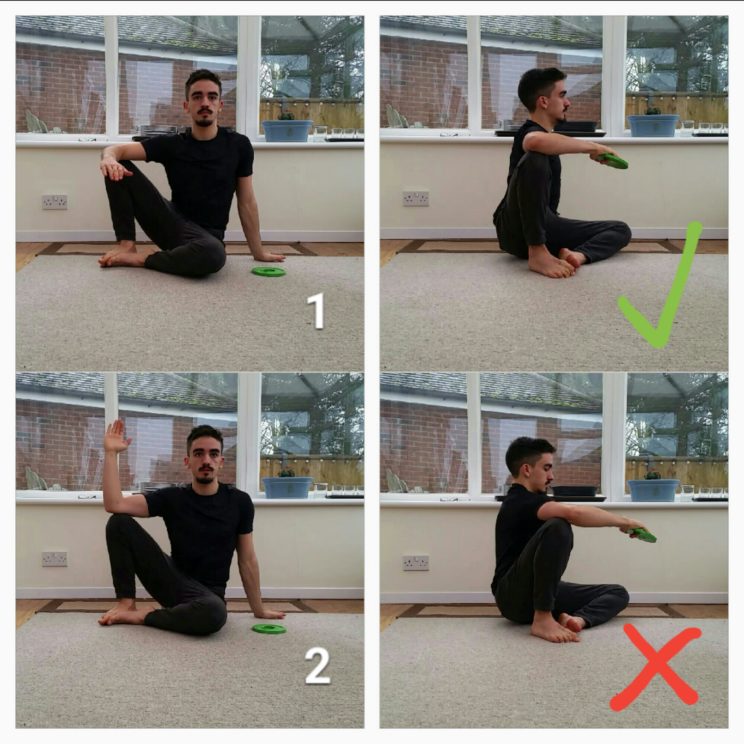
The best, simplest Isolation exercise I know for the external rotators is the knee supported one arm rotation. It can be done effectively without ANY weight to help get a hold of how to activate the muscle, and can be used with weight to strengthen the external rotators. Luckily very little weight is needed (about 1kg should hold people off for quite a while as you can and should build up reps on this) so something like a litre water bottle, or perhaps a heavy book should be enough and you don’t need any dumbbells or plates.
To do this, sit on the ground with one knee up, foot on the ground, and one leg comfortably bent in front of you. Place your elbow on your knee and bend your elbow to 90 degrees. Start with your arm pointing straight up, with your shoulder pushed away from your ear and pulled back, then rotate your arm so that your forearm points forwards or slightly down, then back up to the starting position.
This movement isnt about how it looks so much as how it feels. The position of your shoulder (fully down and back) being maintained throughout the whole movement is important for getting the right feel. If you can’t feel it in the right place (back of your shoulder) initially, don’t worry. It might take a few 10 or 20 reps or 4 or 5 sets of consciously trying to feel it if its really inhibited. The one thing I would warn is, if you can’t feel it, don’t up the weight because it must be ‘too easy’. If you have good mind-body connection you should be able to forcefully contract a muscle without weight. I use 2kg on these now, and I can still contract so hard I make the muscle cramp sometimes with no weight. Weight should be added very VERY sparingly. This is not an ego lift.
Internal Rotator/External Rotation Mobility:
Often people’s internal rotators are very short and tight so they need less direct strengthening than they do stretching. Not to say they don’t ever need strengthening, but for most of the population, they aren’t tight because they are weak, they are tight because they are very strong compared to the external rotators (put simply, they VERY EASILY win the game of tug of war they play to keep the shoulder in the right place). Therefore, stretching them will work well to help the balancing out you are doing by strengthening your external rotators.
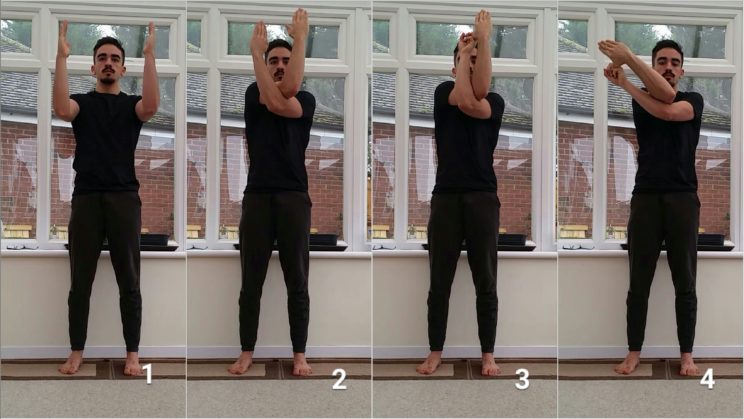
To do so, you can do ‘eagle arms’ from yoga if you have no equipment. However it does require a certain degree of requisite Mobility already in order to do.
To perform this stretch, outstretch both your arms infront of you, and then bend your elbows to 90 so your forearms point up to the sky. Then place the elbow of the arm to be stretched into the crook of the other arm. Then try to grab the hand of the top arm with the bottom arm, (for tight people, this might just be hooking a finger round the top hand’s thumb. For less tight people, that’ll be touching the palms together and interlacing the fingers) and rotate the shoulder externally (Get the forearm to point out away from your body).
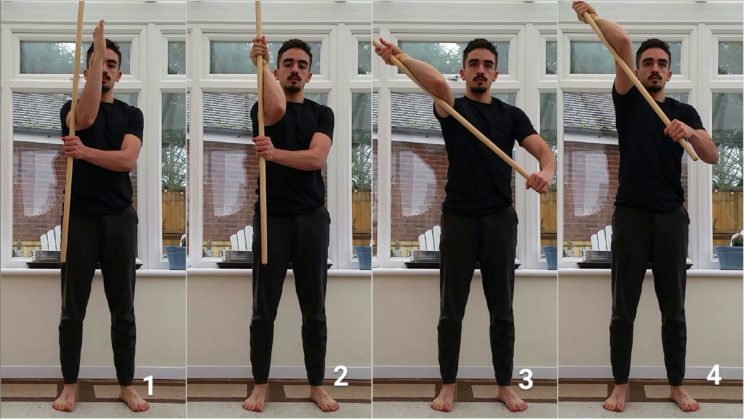
If you do have equipment, you can use a broomstick, a pvc pipe, a broomstick or any other stick.
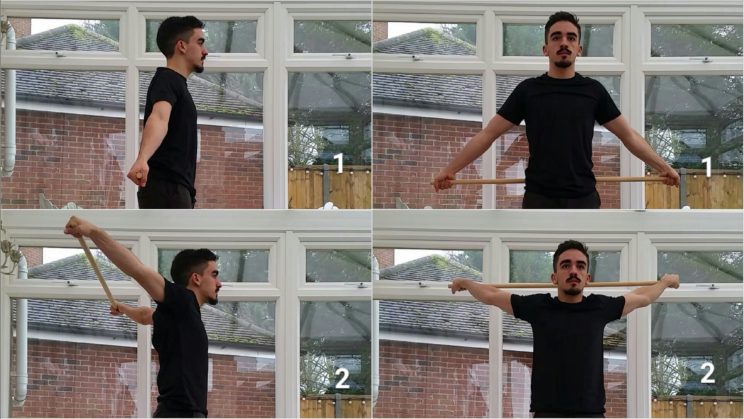
To do so, put your forearm on the side of the stick closest to you and wrap it around the front of the stick grabbing it from the other side, as pictured. Then grab the stick below your forearm and pull it towards you. The stick performs the same role as the bottom arm in the first example, but you can make it a much stronger stretch.
For either of these stretches, if you want to make it more intense, as you move your arm into external rotation, also move your arm up as though you were trying to get it overhead.
Upper Trap:Lower Trap Strength Ratio:
One of the big risk factors for shoulder impingement is the ratio of upper to lower trap strength. A very common issue due to the lifestyles we live in modern sedentary society is that people have overactive, very strong/very tight upper traps, and very weak if not entirely inhibited/inactive lower traps. The upper and lower traps are both upward rotators of the scapula so have balanced strength in them is important for overhead Mobility.
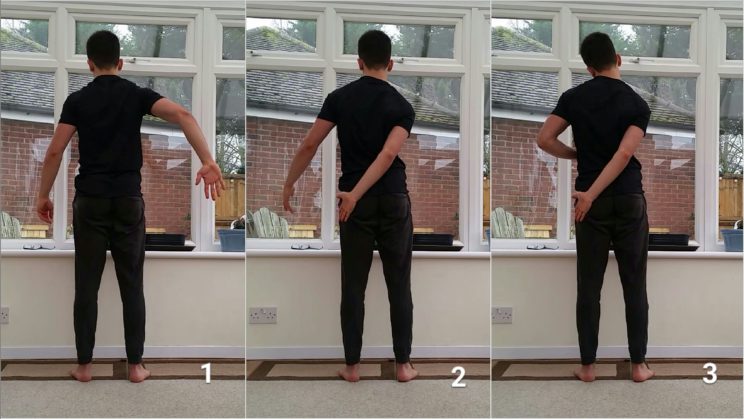
Upper Trap stretching is fairly straight forward. My favourite stretch goes as follows.
Take the arm of the side you want to stretch and extend it down into the opposite ‘back pocket’ area, pushing your shoulder down away from your ear. Then tuck your chin in and tilt your head to the opposite side, lengthening the distance even more between your ear and shoulder.
Lower Trap Strengthening is not so straight forward, sadly. Depending on how bad your lower trap weakness/inhibition is, you might have your work cut out for you.
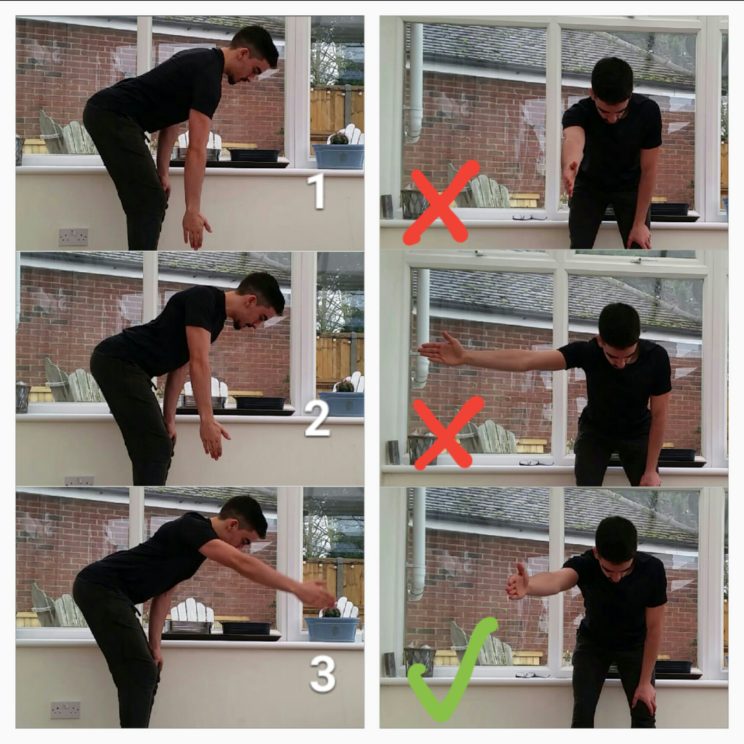
My personal favourite is the trap 3 raise. This is for a few reasons. 1: it can be loaded. 2: it is actually working in an overhead movement pattern 3: it is the drill I and many others I’ve coached have found to be the most effective for Activation.
To do this, hinge forward and place the non-working arm on your thigh for support, with the working arm extended down to the floor. Then push your shoulders away from your ear very hard, and pull your shoulder blades together as far as you can without your shoulder coming up towards your ear again. Then raise your arm up not quite straight up, but about 10-15 degrees out. Don’t try to get your arm over your head. Focus on a controlled movement, maintaining that shoulder position, and go as far as you can get a strong contraction in your lower trap. If you got too far before you are ready you won’t feel it.
However if that feels too complicated for someone that perhaps has no clue how to even TRY to activate their lower traps, try one of the following:
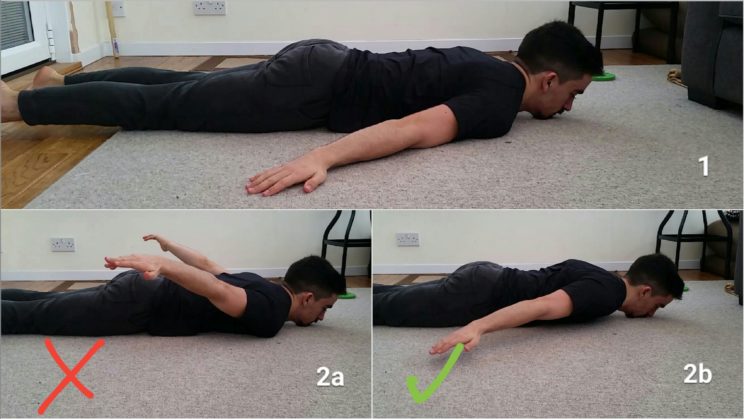
Lay stomach-down on the floor, arms outstretched either side of you. Very simply, reach down as far as you can to try and touch your toes, shoulders pushing far away from your ears. From here, without letting up any of that downward push, start to try to pull your shoulder blades together. Important: do not allow your shoulders to raise up even a little bit to get your shoulders all the way together. Only go as far as you can keep your shoulders down. Reach the end point you can achieve without shoulders raising, then relax and repeat.
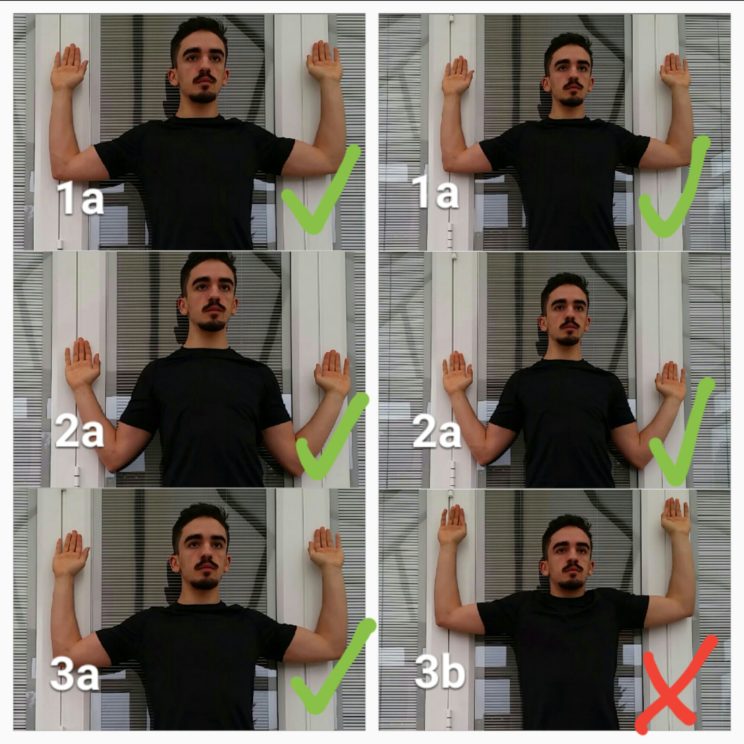
The other option is to put your back to a wall, put your arms up like goal posts, then again push your shoulders away from your ears and maintain that position. Then slide your elbows down the wall as though you were trying to tuck them into your back pockets, and then slide them back up to the goal post position, at no point allowing your shoulders to raise.
All of these will take practice. a lot of practice. At first you might not be able to do them right, and after you can do them right you might not feel them, but stick with it. Once you get a hold of one of the easier variations ideally you should move onto the trap 3 raise.
Serratus Anterior Activation:
The third upward rotator apart from the two trap fibres is the serratus anterior. This guy needs to be just as strong and active so all the upward rotators can work together in concert as they are intended.
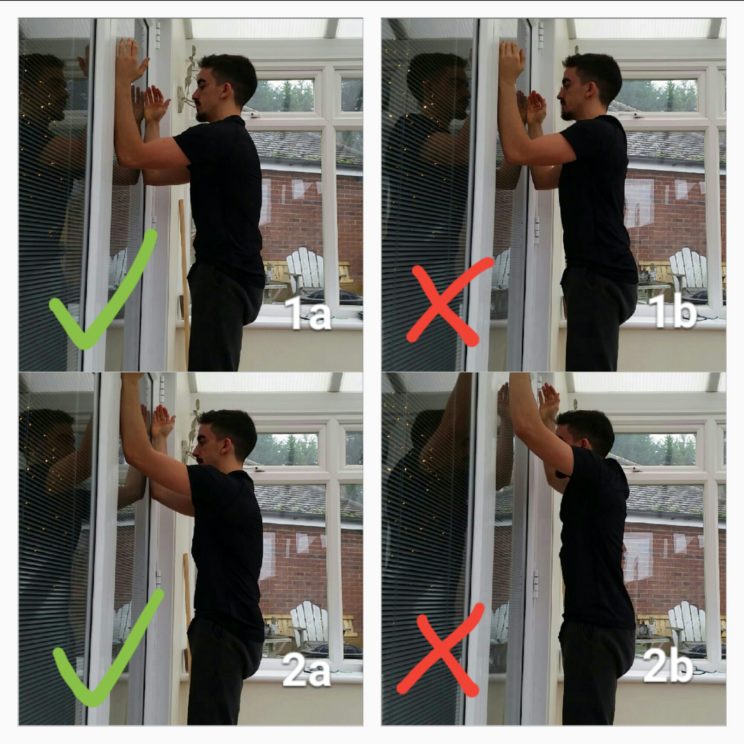
Serratus Slides are the best exercise I’ve found for activating the serratus so far. To do this, put your forearms on a wall pointing just slightly out from straight upwards. Push your shoulders forward (protract; spread your scapula apart on your back). Maintaining that position, slide your arms up the wall. Important to note that your arms should not slide straight up, they should slide about 10 degrees out from straight up. Also important to note is that your shoulders should be pushed forward the whole time. If they aren’t you may not feel it very well. Again, this may take some repetition to be able to feel.
Improving Posterior Scapular Tilting:
The final aspect of scapular movement that should be attended to is scapular tilting. If your scapula/shoulders have that ‘rolled forward’ look or if you see the bottom tip of your scapula seemingly sticking off of your back, then your scapula is ‘anteriorly tilted’ and will prevent overhead motion. Overhead movement is facilitated by posterior tilting of the scapula. the lower traps will help to some degree to perform posterior tilting, but the culprits preventing this are the pec minor and the short head of the biceps.
Pec Minor
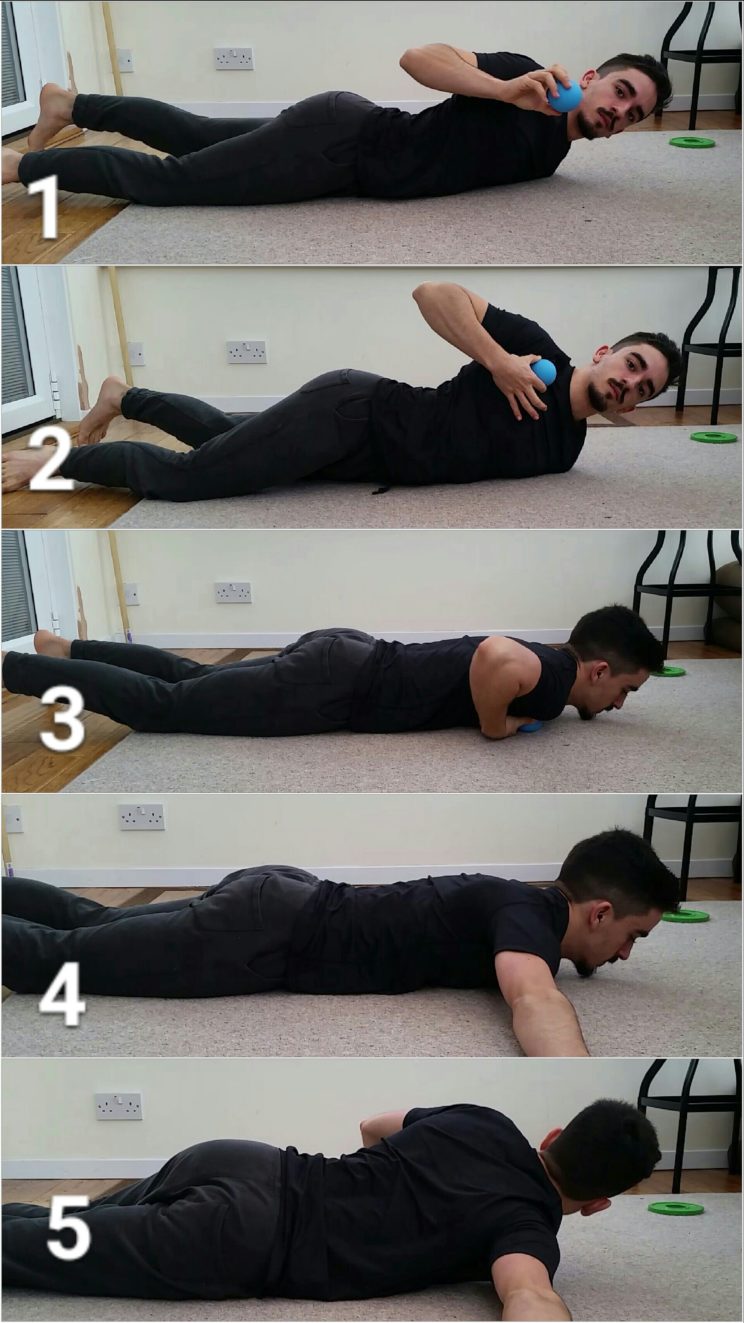
Pec Minor Release is tricky because of the attachment points of the muscle meaning you can’t really ‘stretch it’. As such, you need a lacrosse ball, tennis ball, or other ball like item for this. To release your pec minor, lie down on your front with the ball placed in the following area. Roll around gently til you find a particularly tender spot, and sit on the spot, breathing deeply for at least 2 minutes or until it dissipates. Potentially repeat a few times if you feel its needed.
This can and should be repeated on the front of the shoulder (the anterior deltoid) as well. Working the pec minor is essentially working the divet just inside your shoulder. Working the anterior delt is just working ON the shoulder. You can do one after the other. Anterior Delt can often be overactive due to lower trap weakness, and if you inhibit it through rolling, then your lower trap will HAVE to pick up the slack so your Activation drills will be easier. If you couldn’t feel the drills before, this might help fix that. (This doesn’t improve your posterior tilting, but it pairs well with pec minor, so I included it here instead of the lower trap section)
Short Head Biceps:
Short Head Bicep release, sadly, also requires a stick. Honestly if you are serious about improving your Mobility, just getting a 2 dollar broomstick handle is the best investment you can make, there’s so much more you can do with it than this and the external rotation stretch i mentioned above. Anyway, to stretch the short head biceps. Hold the stick behind your body with a fairly wide grip and your palms facing you, then raise it up high behind you. If you can’t get it high enough or you don’t feel a stretch, try holding it wider. Another option if you don’t have a stick and are PARTICULARLY tight is the Tabletop, however after a point this won’t give you much of a stretch and I prefer the active component of the stick drill for reciprocal inhibition.
Improving Rib/Lumbar Integrity in Overhead Movement
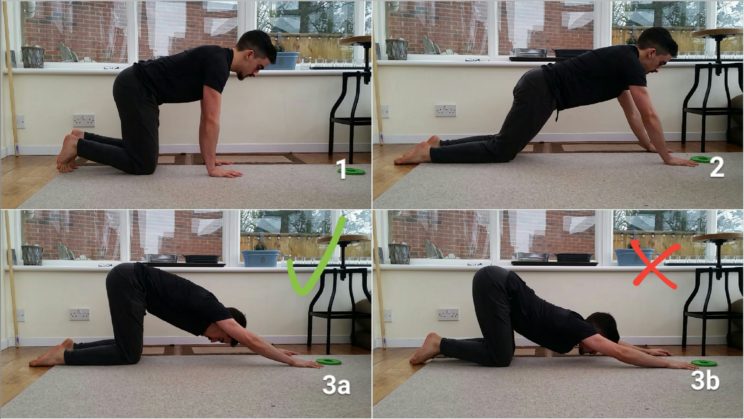
Puppy Pose done correctly is a good way to coordinate proper rib position in overhead. To perform this movement, get in a quadruped position, hands under shoulders and knees under hips. Walk your hands forward to make space for your chest and then push your chest to the ground. The important point here is, you should tuck your pelvis down so your lower back doesn’t arch, and you should push your ribs down onto your chest (dont let them flare out, keep them flat. Tense your abs like a kid is gonna punch you in the stomach). You may feel a good stretch in this, but if you don’t, don’t worry. This is more about learning how to go overhead without compensating in your spine. Don’t be worried if you can’t go very deep to begin with. How well you do it is more important than how far you can go.
If you can’t keep your ribs down and your lower back flat, or if you can manage but only with GREAT difficulty and the amount you can push through in the pose is limited by your ribs and low back just being on the cusp of losing integrity, then you need more strength in the position. You can build that by adding in Dead Bugs to this routine.
Brief Summary of Justifications:
- Pec and Lat flexibility helps improve your humeral Mobility
- Rotator cuff work helps keep your humerus centred in the socket in all positions, meaning no impingement!
- Upper:Lower Trap Ratio and Serratus Work further reduces impingement risk, and will improve the upwards rotation of your scaps needed to facilitate having your arm overhead (So your humerus doesn’t just slam into a wall)
- Anterior Delt Rolling will inhibit it, allowing your lower trap to take on more of the load, making Activation work more effective
- Pec Minor and Short Head Bicep flexibility will improve your posterior scapular tilting, giving your humerus even more space to move without slamming into anything
- Rib/Lower Back Integrity Work will actually start allowing you to transfer this stuff to anything and everything from handstands to jerks and OHPs.
Turning That Into a Program:
Downloadable PDF Cheat Sheet of Routine
- Pec Minor Release: 3 min each side
- Anterior Delt Release: 3 min each side
- Upper Trap Stretch 60s
- Short Head Bicep Stretch 60s
- Lower Trap Activation 2x10r
- Serratus Activation 2x10r
- External Rotator Activation 2x10r (Depress, Retract, Use Minimal Weight)
- External Rotation Stretch 2x90s (Progress by either: Raising arm OR rotating more)
- Pec Stretch 2×90/2min (Arm out, roll away. ‘T’ arms and ‘Y’ arm)
- Lat Stretch 2x2min (Arm on surface, same side leg far back + to the side)
- Puppy Pose 3x10r+10s (+ pair in 3 sets of Dead Bugs if you need) (Ribs down, back flat, push through)
Performed 3x/week, and you’re golden. Let the gains roll in.
Support the Creator!
I make a lot of my content for free because I want to help people as much as I can, and want to make fitness as accessible and easy to understand as possible, I wouldn’t think of charging for any of what you see here, but running this site (and being alive!) has some costs associated with it!
If you like this content a lot, want to keep the site ad-free, and want to say thanks to the person that made it (me!), you can send me a one-off or monthly tip on Ko-fi here! Also, I have a premium exercise library hosted on this site with currently 325 exercises in it that you can subscribe to for only £5 per month. If you do decide to sign up, it’d be even better for you than donating anyway, because you get some nice premium content as well!


Leave a Reply
Your email is safe with us.
You must be logged in to post a comment.