Squats:
Squats are without a doubt one of the most important movements you will ever learn, and you could even go so far as to say that they are a fundamental pattern of human movement. Before things like chairs came around, squatting was how people sat to hang out and even how they pooped (our bowels are even designed to best do so in a squat). In fact, in many parts of the world, both of these things are still done. However, the way these squats look and how we will be performing them today are fairly different.
From an exercise and strength building context, squats (paired with some kind of weighted ‘hinge’ or glute bridge movement) are as close as you get to a ‘total package’ for your lower body strength. That’s why it’s one of the 6 exercises you learn in my BWF Primer routine (A free routine for total beginners to exercise that’s meant to give you a slow introduction to fitness, that starts with just one exercise on day one and builds up to the full routine over 14 days).
The form for squats can be a little tricky for some to achieve, especially if they have limited ankle or hip Mobility. Now why is the form for an ‘exercise’ squat so particular you ask? Simply put, proper form for squats will maximise the strength and muscle benefits you get from doing them, put your spine in the best position to withstand external load (if you ever decide to squat with weight, which you definitely should eventually), and minimise any undue strain on your knees.
The following guide is going to outline the basic universal standards for form when it comes to squatting, and then outline the ways in which squat form can vary based on intent and individual Mobility.
Important Note:
From the perspective of getting the most out of this guide, it would be in your best interest to film yourself from the side and front doing a fw reps of squats, and watch them back as you read this guide in order to get a frame of reference, and see which parts of the guide are most helpful for you. (Don’t worry if you don’t have a tripod to frame yourself up, you can just prop your phone against something and use the front facing camera to frame where you will be standing.)
Also the following summary of this exercise is described in about AS MUCH DETAIL AS POSSIBLE. If this is your first time learning about this exercise, this may feel like an overwhelming amount of information to you to begin with. Do not worry, this guide is so detailed simply because it is a reference guide, and not everything needs to be absorbed and perfectly replicated on your very first read through. You will most likely come back to read this guide many many times as you learn.
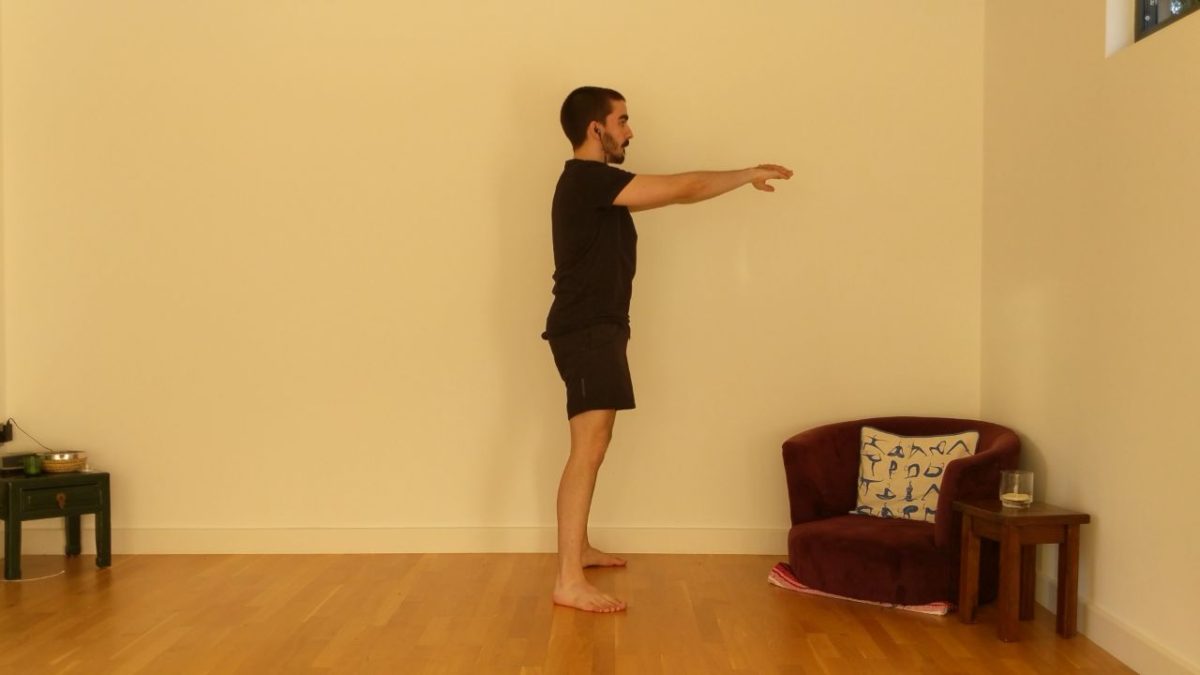
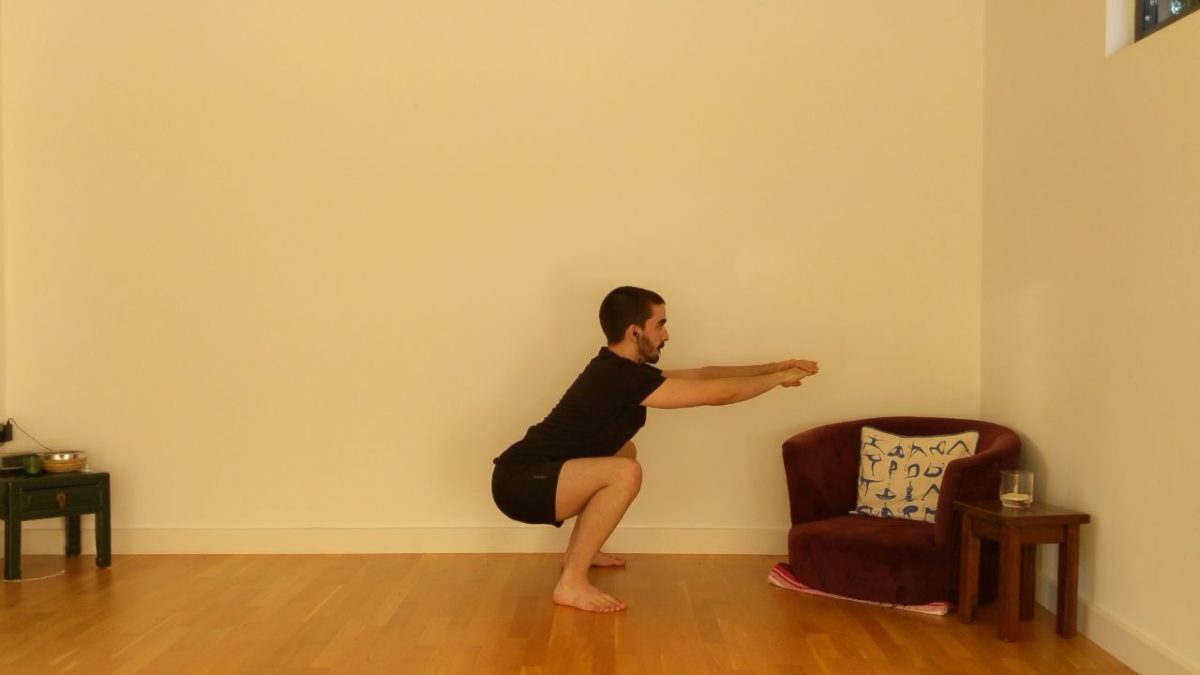
Summary (Side View)


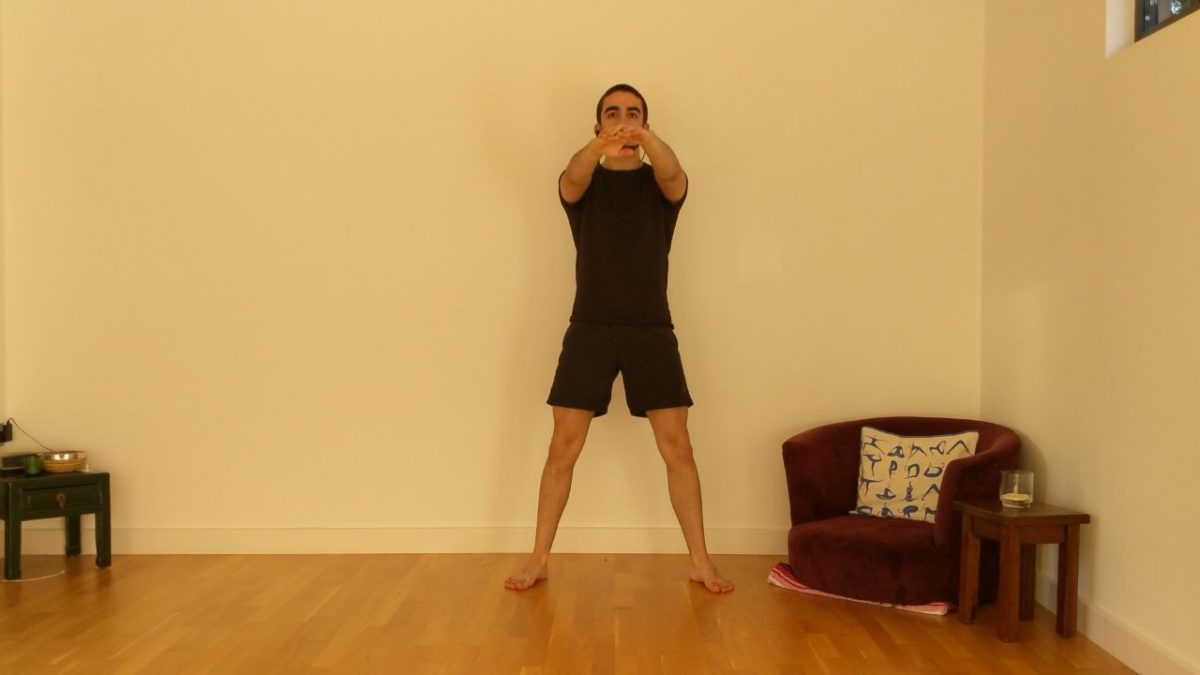
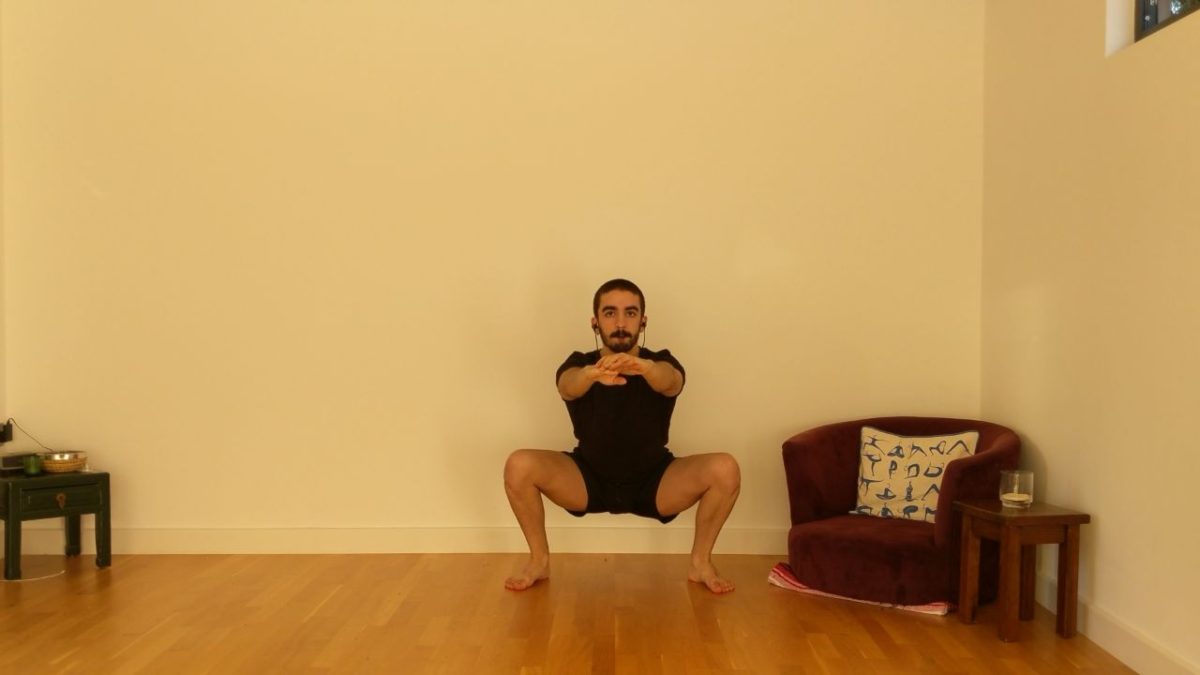
Summary (Front View)


NOTE: This summarisd form is an example of a good squat form for my individual anatomy and leverages. Everyone’s squat can look slightly different, and this will be covered in the next section.
Start Position:

- Stick your chest out to extend your upper back, and contract your abs to keep your ribs down. (This will feel contradictory, like a tug of war, but it will help you to maintain torso tension, and you will get better at extending over time).
- Keep your hips vertically over your heels, and your shoulders vertically over your hips (hips not sticking out behind you, or pushed way forward)

- Take a shoulder width (or wider) stance, with the feet pointed forward or slightly turned out (but not more than 10-15 degrees)
- Stick your arms out directly in front of you, one hand on top of the other, and look just past your hands
Movement:
- Keep the heels in firm contact with the ground
- Sit your hips back as you send you knees forward.
- Your spine should remain in a neutral position as you descend (no rounding)
- Push the knees out as you descend, as far as you can without letting the inside edge of your foot come off the ground.
End Position:

- Spine straight from shoulders to tailbone (no rounding in the lower back, especially)
- Heels and forefeet firmly planted on the ground
- Descend until the crease of your hip is below the top of your knee (or as deep as you can without rounding)

- Inside edge of foot/ball of the big toe in contact with the floor
- Knees as far out as possible
Variations in Form:
Now the above outlined form is very general, and the videos and pictures will do a very good job of acting as a reference if you happen to be shaped like me (short torso, long legs) and have similar Mobility in your hips and ankles. In any case, the process of learning to squat with good form to the proper depth will be a process of experimentation. The following variables can be played with in the interest of finding your perfect squat form.
Stance Width:
Stance width (otherwise known as ‘how far apart your feet are’) is going to vary pretty considerably based on how long your femurs (thighs) are, and also on your ankle and hip Mobility. A wider stance naturally lends itself to individuals with longer femurs, but will require greater lateral (sideways) hip Mobility. A narrower stance will naturally lend itself to individuals with shorter femurs, but will generally require greater ankle Mobility.
Foot Turnout:
The above video is an example of me squatting with 3 degrees of turnout (the widest turnout that I would recommend, ‘normal’ turnout, and then feet straight ahead)
Foot turnout functions in a very similar way to stance width. The more turned out your feet get, the more you can push your knees out, acting similarly to stance width. However, turnout has a particular caveat that stance width does not. The more turned out your feet get, the less torque you generate in the squat.
When your feet are pointed straight forward, the process of pushing the knees out generates torque within the ankle and knee, stored up like a spring that increases your ability to exert force (i.e. push harder, be stronger in the movement).
Essentially, the more turned out your feet are, the less torque is able to be generated, and thus the less strong and stable your squat may feel. For this reason, there is a limit to the degree of turnout you can achieve before your squat becomes unreasonably unstable and it actually becomes harder to keep your knees out as you squat.
For various reasons your most comfortable squat form at the time of reading this may be with a considerable turnout, and no matter how you experiment you simply cannot find a good squat stance with feet pointing any more forward.
In this case, it would be in your best interest in my opinion to simply squat with as minimal turnout within your doable range as possible, while working on your Mobility to increase the degree to which you can get your feet forward.
Excluding unchangeable factors like the structure of your hip joint, improving your external and internal hip rotation and your internal tibial rotation will help in this respect.
Practical Impact: Torso Angle/Lean
Aside from how manipulating your foot position may help you to squat to proper depth, it will also change the angle of your torso.
Here is a video of 3 different squats. In this example I have my stance narrower than normal to put myself in a more challenging and unfamiliar position. As I have relatively limited ankle Mobility, the impact of foot turnout in this challenged position will have a huge difference in how my squat looks.
In the first rep I have my feet more turned out than is usually comfortable. This results in a very upright squat because my knees are so far out that my hips can be almost over my heels.
In my second rep I use my normal turnout, which results in my hips shifting a little further back and my torso leaning a bit forward.
Finally, in my third rep with my feet pointed straight forward, the length of my femurs becomes apparent as my hips are miles away and as a result I adopt a very leant over position in order to maintain stable balance across my whole foot.
This has important practical implications for when/if you move into barbell squats. A more leant over torso position will mean a ‘low bar’ squat is more appropriate for you, whereas a more upright position will mean a ‘high bar’ squat is more appropriate, or even a front squat. (For those that don’t know what this means, do not worry about it for now!)
Initiation:
Hip Initiation
Knee-Hip Initiation
This is sort of the other side of the coin to torso angle. The term ‘Initiation’ refers to whether you start (initiate) the squat by sending your butt back first and then bend the knees after a moment, or by simultaneously bending at the knee and hip. More upright squats will find balance better with knees initiating simultaneously to the hip or soon after, whereas more leant over squats will find balance better with a considerable bias towards hip initiation. This is because the hip initiation will allow the torso to get into the appropriate degree of lean by the bottom of the squat.
Scaling it to be Easier or Harder:
Easier: Box Squats
Sit Box Squats
Tap Box Squats
If you struggle with the Mobility to squat to full depth, or you find your balance tends to make you fall backwards at the bottom, box squats can be a very useful tool to work on while you improve your Mobility by other means.
Tap Box Squats can be good to help you find your balance at the bottom of the squat, as well as dialling in your consistency in hitting the same depth every rep. To perform, do a normal squat and descend until you gently touch the box/chair/surface, stay tense in that position for a moment, and then stand up. If you cannot hit depth normally, these are useful to help you practice with the depth that you can achieve, and then over time lower the height of the box/chair/surface until you are at the proper depth.
Sit Box Squats can be good if you simply do not have the Mobility to maintain your balance in the bottom position stably across the whole foot, but still need a good way to squat. For this, squat down until you touch the bench, then sit down. Then lean forward back into your squat position to get your weight back over your feet, and stand up.
Harder #1: Weighted Squats
Any squat: upright, leant over, box squat, can be done with a barbell or other weight added. Guides for how to do this are coming soon!
Harder #2: Unilateral Squats
If you do not have access to weight, unilateral squat variations are another great option to continue to challenge your legs so they can continue to gain strength. The following are my three favourite single leg squat variations for strength building, click below to be linked to a guide explaining how to do them:
Common Form Errors/Compensations:
Losing Heel Pressure
Incorrect
Correct
Why this happens:
If this is happening, it’s likely that:
- You are simply not putting enough focus on keeping the heel firmly planted into the ground
- You are trying to squat too upright for your ankle Mobility
- You are trying to squat with your feet too narrowly together for your ankle Mobility
How to fix it:
- Try to keep your weight settled evenly across the front and back of the foot. Don’t let it drift forward as you descend.
- Consider adopting a less upright squat form, and/or taking your stance out a bit wider.
Losing Inner Foot Pressure
Incorrect
Correct
Why this happens:
You are trying to drive your knees out, but your tibias cannot rotate sufficiently to keep the feet flat on the ground.
How to fix it:
Step 1 in this case will always be to try to improve your internal tibial rotation Mobility, but in the meantime as that improves you can work on modifying your stance (width and/or foot turnout) to continue squatting without losing inner foot pressure.
Foot Slide
Incorrect
Correct
Why this happens:
You are trying to push you knees out, but your tibias cannot rotate sufficiently, and so your feet rotate out instead.
How to fix it:
As above, finding some Mobility drills to improve your tiial rotation will be the here, but in the meantime:
- Don’t push the knees out so far that the feet start to slide
- Squat with slightly more turnout anyway
- Adjust your stance width
Knee Valgus
Incorrect
Correct
Why this happens:
You are not engaging your glutes properly
(May also be a tibial rotation issue if you simply cannot get your knees out even if you try)
How to fix it:
Start the squat with actively clenched glutes, and focus more on ‘spreading’ your feet apart and/or twisting them into the ground to get your knees to point outwards.
‘Excess’ Knee Initiation
Incorrect
Correct
Why this happens:
You are trying to squat too upright for your Mobility/stance, and are also initiating with too much knee and not enough hip.
How to fix it:
Practice sitting back with your hips a little more than is natural at first, and then you will find a middle ground over time.
Lumbar Rounding
Incorrect
Correct
Why this happens:
Insufficient hip Mobility
Insufficient abdominal bracing and back tension
Inappropriate squat stance for your Mobility
How to fix it:
First and foremost, experiment with your squat stance to see if you can find a way to squat without rounding.
Next, see if focusing more on your abdominal bracing and back tension will help keep everything in place at the bottom of the movement.
If neither of these work, it will be a matter of workingon your Mobility, and working on box squats in the meantime
Lumbar Hyperextension, or… ‘Butt Wink’
Incorrect
Correct
Why this happens:
Often trying to over-correct from rounding (shown above) by excessively extending the lower back, but ultimately still missing abdominal bracing.
How to fix it:
Improve your abdominal bracing.
Join my Discord Server!
If you’ve read this far and still have questions, I’d highly recommend joining my Discord Server! There are plenty of knowledgeable folks there (including me sometimes!) that can answer your questions.
Support the Creator!
If you like my content a lot and want to say thanks to the person that made it (me!), you can send me a one-off or monthly tip on Ko-fi here! Also, I have a premium exercise library hosted on this site with currently 325 exercises in it that you can subscribe to for only £5 per month. If you do decide to sign up, it’d be even better for you than donating anyway, because you get some nice premium content as well!
(ON THE PRESENCE OF ADS ON THE SITE:) I make the majority of my content for free because I simply want to help people as much as I can, and want to make fitness as accessible and easy to understand as possible, but running this site has some costs associated with it and like everyone in this world I’ve got bills to pay! I have had manual donation buttons and optional paid subscriptions on my site for years so I could avoid hosting ads for as long as possible, but the number of supporters to the site has not grown proportionally with increased traffic (and associated running costs from improvements to the site) over time.
Ultimately, that has informed the decision to host ads on the site. In an ideal world, if I were able to get enough consistent supporters to the site, then I could go back to making the site fully ad-free. At the same time I recognise that is not realistic, as a lot of people who appreciate my content the most do so because it is completely free, and would ultimately rather choose a few ads in my articles than having to pay for access.

