How to do Dips
The Dip has been occasionally referred to by some as the ‘Squat of the upper body’. Perhaps because it’s probably one of the best movements to do load heavy and is a great tool to develop pushing strength. However, it’s also probably called that because of the extreme commonality of performing it terrible in a way that massively increases its injury potential. In the same way that misinformed gymgoers say that ‘squats are bad for the knees’, many say that ‘dips are bad for the shoulders’. Neither is necessarily true*. If you perform dips properly you will see a great increase in your chest and tricep strength that is hard to find in many other exercises.
The dip is one of the 5 fundamental upper body exercises in bodyweight fitness (the others being the Pull-up, Push-up, Row, and Pike Push-up). Despite not being a default exercise in my ‘Bodyweight Strength Foundation‘ workout routine, you still might be coming to this page from there if you don’t like pike push-ups or just happen to be a dip-lover! If so, Hi!
Enough of the pre-amble, lets get on with learning about dips!
Important Note:
From the perspective of getting the most out of this guide, it would be in your best interest (if possible) to film yourself from the side doing a few reps, and watch them back as you read this guide in order to get a frame of reference, and see which parts of the guide are most helpful for you. (Don’t worry if you don’t have a tripod to frame yourself up, you can just prop your phone against something and use the front facing camera to frame where you will be standing.)
Also the following summary of this exercise is described in about AS MUCH DETAIL AS POSSIBLE. If this is your first time learning about this exercise, this may feel like an overwhelming amount of information to you to begin with. Do not worry, this guide is so detailed simply because it is a reference guide, and not everything needs to be absorbed and perfectly replicated on your very first read through. You will most likely come back to read this guide many many times as you learn.
Summary:
Start Position

Movement B
Movement A
End Position(s)

Start Position:
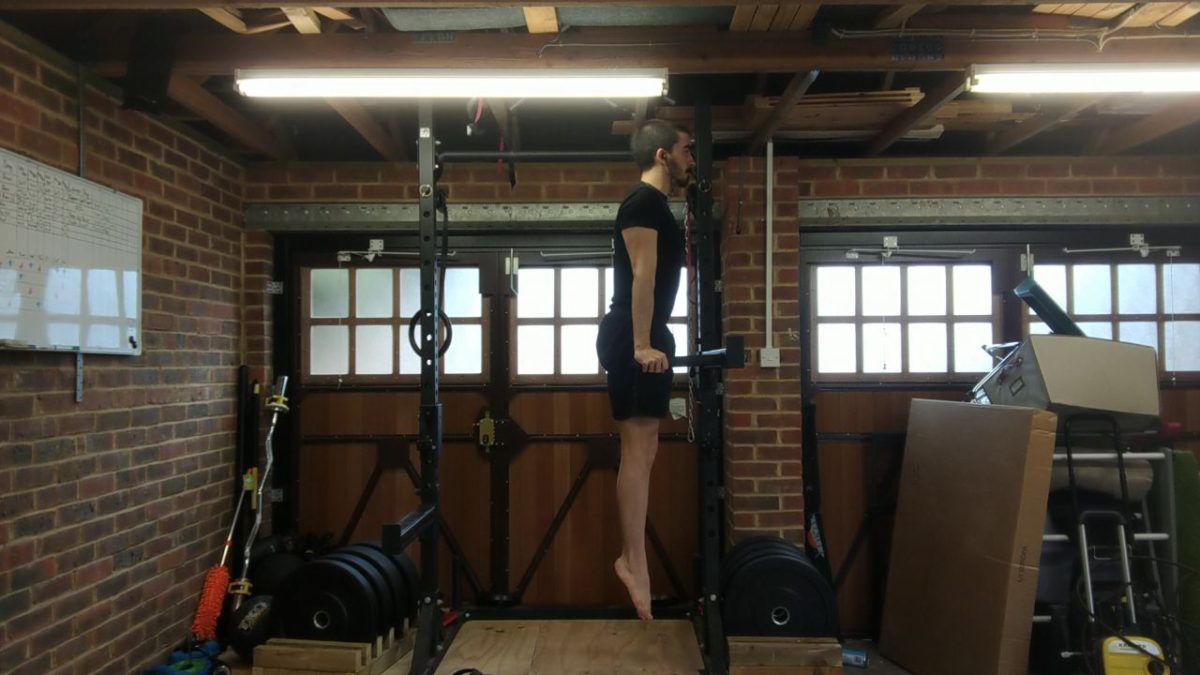
The start position is as follows:
- Elbows are locked straight
- Shoulders are positioned neutrally (not protracted or retracted)
- Shoulders are not collapsed (Pushing the bottom tip of the scaps into your back)
- Shoulders are depressed (pushed away from the ears)

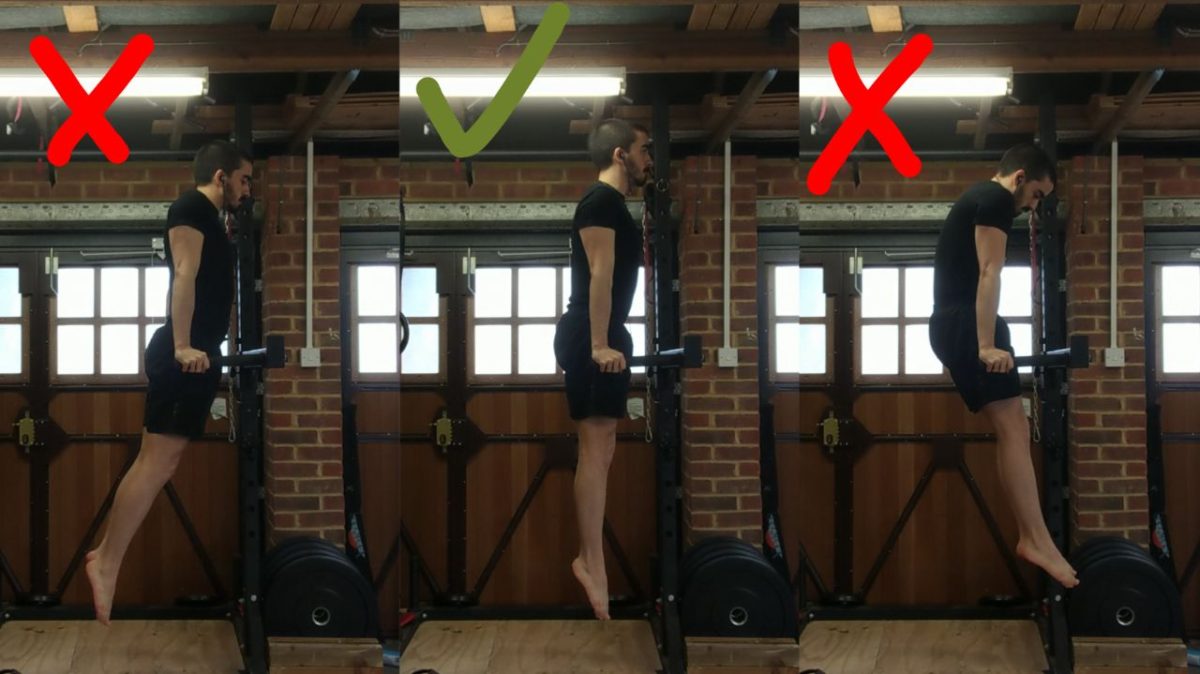
The left example is a support hold where sufficient shoulder depression is absent (shoulders are up to the ears), the abs are not engaged to keep a neutral spine position, and the shoulders are excessively retracted.
The right example is a support hold with excessive protraction causing upper back rounding (thoracic flexion) and as a result the rest of the body curls up to balance, with the lower back similarly rounding and the legs moving in front of the body.
Movement:
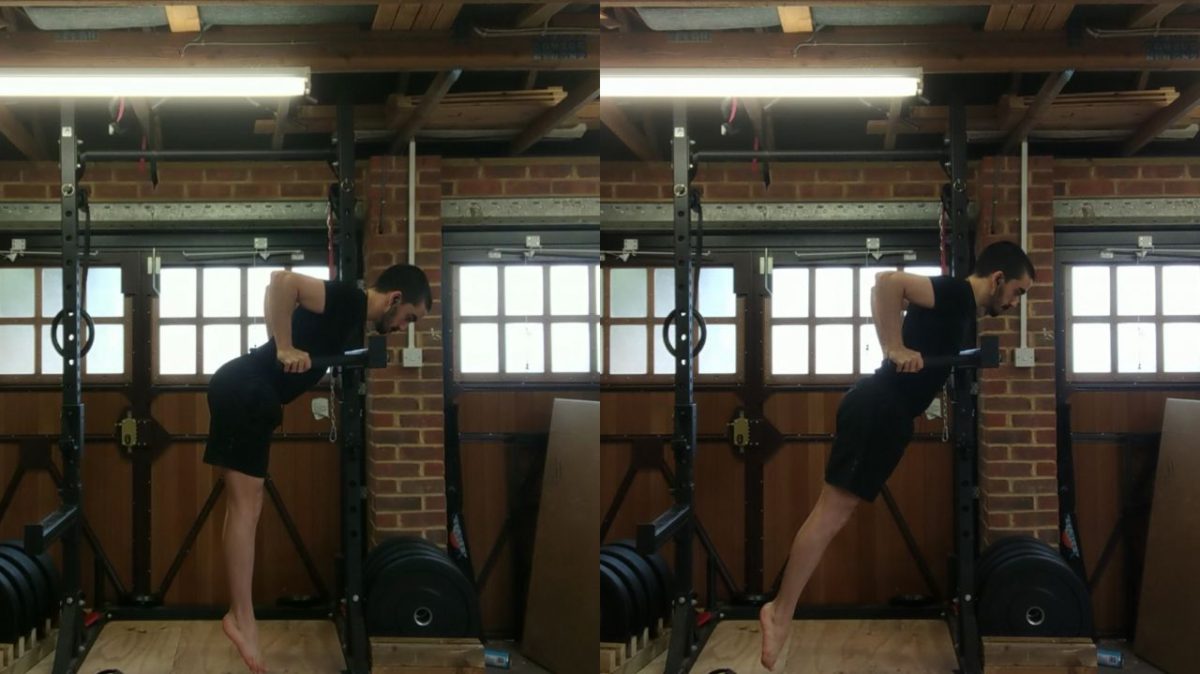
- Forearms stay vertical
- Upper back stays tight and does not round to achieve depth
- The ROM is defined by a radial movement of the shoulder around the fixed point of the elbow (as shown)
- Torso leans forward to varying in order to achieve depth relative to your shoulder extension Mobility*
*The less shoulder extension you have without your shoulder collapsing forward, the more you will lean forward, and vice versa.
End Position:
- Depth is achieved at or just below the point at which the upper arm is parallel to the floor
- Shoulders and upper back are tight, not collapsed forward

Common Compensations:
Shoulder Caving:
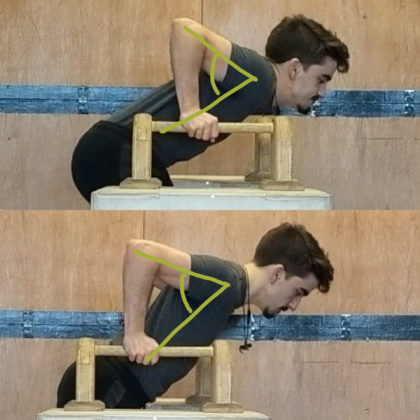
Incorrect:
Correct:
Why this happens:
A lack of back tightness
Attempting to go too deep for your relative shoulder extension Mobility
Leading the movement with the shoulders
How to prevent this from happening:
Focus more on shoulder position: Point collarbones up, shoulders down and back
Look elsewhere to see if shoulder collapse is common in your other movements (particularly push-ups, but also pull-ups and rows)
Only go to a depth you can maintain without collapsing
Side Note on ROM:

Some proponents of ‘deep dips’ do so because the say it gives you greater range of motion, and so greater strength gains. However, that is not functionally the case. The greater range you get from ‘deep dips’ where your shoulders collapse forward in order to get your shoulders closer to the bar comes from your upper back rounding and your shoulder blades dumping forward (Anterior tilt). If you look at the photo above, you’ll notice the actual degree of real shoulder extension is exactly the same between the dip below parallel with proper shoulder position, and the “deep dip”.
Elbow Flare
Incorrect:
Correct:
Why this happens:
Bad habits/ignorance
Handles far too wide/handles that point towards each other
How to prevent this from happening:
Use dip handles/bars that are only a little wider than shoulder width, and either parallel or pointing slightly away from each other (if the bars you have point towards each other, just turn around and do them in the other direction if possible)
Focus on keeping your forearms parallel from a front view and keep your elbows in.
How to Scale the Dip so Anyone Can Do it:
Push-ups!
If you are working to build strength to be able to do dips, Push-ups are absolutely key. I typically recommend that you should be able to comfortably rep out 10 solid, good form push-ups before beginning work on Dips
Negatives:
Much like in the Pull-up, Negatives are the primary, most effective method of building strength for the dip. You will almost always be able to handle more load when slowly controlling the negative portion of a movement than actually performing the ‘positive’ (The movement), so if you don’t yet have the strength for something, you may still have the strength for negatives.
Banded Dips:
Again similarly to the pull-up, banded dips are a commonly suggested progression for the dip, but due to the unequal tension of the band (helps you more the more stretched out it is, so it makes the movement much easier at the bottom than the top) it’s not an ideal progression. I still like to use it as a intermediary progression between negatives and full dips if the trainee does not feel confident with the movement and wants to just get used to the positive portion, but more often than not, it is entirely unnecessary and negatives build more than enough strength.
How to Progress the Dip to Make it Harder:
Ring Dips:
Ring dips add a stabilising component to the dip making it much harder, as well as recruiting the chest muscles significantly more. The form for ring dips at a fundamental level is the same as the bar, with a few minor additional details. (E.g. ring position, not resting your triceps on the rings, full lockout involving a turnout of the rings at the top)
Weighted Dips:
Adding weight, as always, is the best way to incrementally progressively overload any movement. If it’s available (in the form of weights + a dip belt, or even some dumbbells/kettlebells in a backpack) then defintely use it.
Join my Discord Server!
If you’ve read this far and still have questions, I’d highly recommend joining my Discord Server! There are plenty of knowledgeable folks there (including me sometimes!) that can answer your questions.
Support the Creator!
If you like my content a lot and want to say thanks to the person that made it (me!), you can send me a one-off or monthly tip on Ko-fi here! Also, I have a premium exercise library hosted on this site with currently 325 exercises in it that you can subscribe to for only £5 per month. If you do decide to sign up, it’d be even better for you than donating anyway, because you get some nice premium content as well!
(ON THE PRESENCE OF ADS ON THE SITE:) I make the majority of my content for free because I simply want to help people as much as I can, and want to make fitness as accessible and easy to understand as possible, but running this site has some costs associated with it and like everyone in this world I’ve got bills to pay! I have had manual donation buttons and optional paid subscriptions on my site for years so I could avoid hosting ads for as long as possible, but the number of supporters to the site has not grown proportionally with increased traffic (and associated running costs from improvements to the site) over time.
Ultimately, that has informed the decision to host ads on the site. In an ideal world, if I were able to get enough consistent supporters to the site, then I could go back to making the site fully ad-free. At the same time I recognise that is not realistic, as a lot of people who appreciate my content the most do so because it is completely free, and would ultimately rather choose a few ads in my articles than having to pay for access.

